Saturday, November 29, 2008

Daring Bakers Challenge- Caramel Cake with Caramelized Butter Frosting

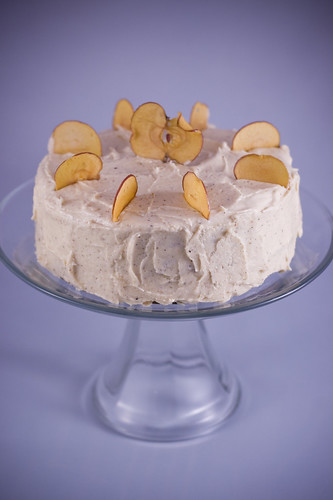
After a few months break from the Daring Bakers Challenges, I am back with the November challenge of the Caramel Cake. I was intrigued by this recipe for several reasons, the caramel sauce that went into the cake itself and also the caramel browned butter frosting. Overall the cake was great, nicely balanced- not too sweet and the cake had a wonderful texture. With only my husband and I around, I was hesitant to make an entire 9" cake so I used some small cake pans to not only make the cake for the challenge but play around with some other ideas that came to mind. With the rest of the batter I came up with a wonderfully simple caramel poached apple cake finished with a little strussel on top requiring very little else. I'll share the details at the end of the post. As you can see I was inspired by the apple theme and also used apple chips to decorate the top of the cake.

Caramel Cake with Caramelized Butter Frosting


Dolores of Culinary Curiosity co-hosted this months challenge with Alex of Brownie and Blondie and Jenny of Foray into Food. The recipe was given to us by a fellow blogger Shuna Fish Lydon at Eggbeater

CARAMEL CAKE WITH CARAMELIZED BUTTER FROSTING
as published on Bay Area Bites

FOR THE CAKE:
10 Tablespoons unsalted butter at room temperature
1 1/4 Cups granulated sugar
1/2 teaspoon kosher salt
1/3 Cup Caramel Syrup (see recipe below)
2 eggs, at room temperature
splash vanilla extract
2 Cups all-purpose flour
1/2 teaspoon baking powder
1 cup milk, at room temperature

Preheat oven to 350F

Butter one tall (2 – 2.5 inch deep) 9-inch cake pan.

In the bowl of a stand mixer fitted with a paddle attachment, cream butter until smooth. Add sugar and salt, and cream the mixture until light and fluffy.

Slowly pour room temperature caramel syrup into bowl. Scrape down bowl and increase speed. Add eggs/vanilla extract a little at a time, mixing well after each addition. Scrape down bowl again, beat mixture until light and uniform.

Sift flour and baking powder.

Turn mixer to lowest speed, and add one third of the dry ingredients. When incorporated, add half of the milk, a little at a time. Add another third of the dry ingredients, then the other half of the milk and finish with the dry ingredients. {This is called the dry, wet, dry, wet, dry method in cake making. It is often employed when there is a high proportion of liquid in the batter.}

Take off mixer and by hand, use a spatula to do a few last folds, making sure batter is uniform. Turn batter into prepared cake pan.

Place cake pan on cookie sheet or 1/2 sheet pan. Set first timer for 30 minutes, rotate pan and set timer for another 15-20 minutes. Your own oven will set the pace. Bake until sides pull away from the pan and skewer inserted in middle comes out clean. Cool cake completely before icing it.

Cake will keep for three days outside of the refrigerator.

FOR THE CARAMEL SYRUP:

2 cups sugar
1/2 cup water
1 cup water (for "stopping" the caramelization process)

In a small stainless steel saucepan, with tall sides, mix water and sugar until mixture feels like wet sand. Brush down any stray sugar crystals with wet pastry brush. Turn on heat to highest flame. Cook until smoking slightly: dark amber.

When color is achieved, very carefully pour in one cup of water. Caramel will jump and sputter about! It is very dangerous, so have long sleeves on and be prepared to step back.

Whisk over medium heat until it has reduced slightly and feels sticky between two fingers. {Obviously wait for it to cool on a spoon before touching it.} ***

Note: For safety reasons, have ready a bowl of ice water to plunge your hands into if any caramel should land on your skin.

FOR THE CARAMELIZED BUTTER FROSTING:

12 tablespoons unsalted butter
1 pound confectioner’s sugar, sifted
4-6 tablespoons heavy cream
2 teaspoons vanilla extract
2-4 tablespoons caramel syrup
Kosher or sea salt to taste

Cook butter until brown. Pour through a fine meshed sieve into a heatproof bowl, set aside to cool.

Pour cooled brown butter into mixer bowl.

In a stand mixer fitted with a paddle or whisk attachment, add confectioner's sugar a little at a time. When mixture looks too chunky to take any more, add a bit of cream and or caramel syrup. Repeat until mixture looks smooth and all confectioner's sugar has been incorporated. Add salt to taste.

Note: Caramelized butter frosting will keep in fridge for up to a month. To smooth out from cold, microwave a bit, then mix with paddle attachment until smooth and light.

This is the variation I had mentioned up at the top. I took some of the leftover caramel syrup and mixed it with equal parts apple juice and added 1 tsp of mulling spices to the pan and gently poached some apple quarters until they were tender but still firm. Ideally these should sit in the poaching liquid overnight or at the very least allowed to sit in the poaching liquid until both the pears and liquid are completely cool. After that I put some cake batter into the pan (filled about 1/3 of the way up the pan) and then placed the apples on top and then sprinkled some strussel on top (optional). I made one cake without the strussel and worked out as well. With the fruit it no longer needed the frosting making it a little more casual and not quite as sweet. This cake was definitely a keeper and the frosting as well!
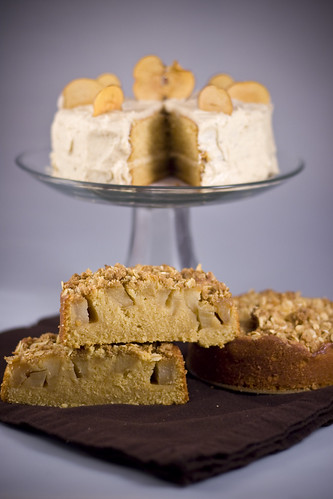
Caramel Cake with Caramelized Butter Frosting


***I found that I may not have cooked the syrup down quite as far as I should have, I found that the bottom of my cake was a little dense and I have a feeling it may have been from a little too much liquid in the batter. When I was boiling my syrup I temped the syrup at 220 F and next time I would go up to 224 F and I think that would eliminate the problem. For those without a thermometer just follow the original directions using your fingers as your guide!

Tuesday, November 25, 2008

Wild Mushrooms and Leeks with Pumpkin Polenta

Here's a lighter meal that shows off the beautiful flavors of fall, I know I'm a little late but should you come across some wild mushrooms here is a great way to use them. Even if you don't have any wild mushrooms or want to bulk it up with some less expensive alternatives, cremini and or portabello mushrooms would make a good stand in. The pumpkin polenta is subtle but slightly sweet and a great way to sneak even some more vegetables into your dish. This makes a satisfying hearty supper that can be served on it's own or paired with... maybe some leftover turkey?


Wild Mushroom and Leeks (adapted from Cooking Light November 2008)
(6 main dish servings)

2 Tbs butter
1 1/2 cups thinly sliced leek
12 oz wild mushrooms sliced
2 tbs chopped fresh Italian parsley
1 tsp fresh sage finely chopped
3 tbs dry sherry
salt and pepper to taste

Saute the leeks in the butter over medium high heat. After the leeks begin to soften add the mushrooms and cook until all the moisture has evaporated. Add the sherry and the herbs. Season with a sprinkle of salt and pepper to taste.

Pumpkin Polenta

1 cup polenta
4 cups of water or stock (vegetable or chicken) or a combination of both
1 1/2 cups pumpkin puree
1/2 cups Parmesan
salt and pepper to taste

Combine the polenta and water and or stock in a medium sauce pan and bring to a boil. Turn the heat down and let simmer for 15 minutes or so until the grain is soft and fully cooked. Keep and eye on it and stir every few minutes. After the polenta is done cooking keep the heat on low and add the pumpkin puree, Parmesan and salt and pepper to taste. Let it briefly come back up to temperature after adding the puree. Turn off and serve immediately, or it can be made ahead of time and gently reheated.

Monday, November 24, 2008

Tea Spiced Cranberry Sauce

I thought that I should be posting something season appropriate, maybe something to inspire an upcoming holiday meal menu. Many different items came to mind, which I will post as time goes on but for now I setteled on one of my favorite things at a thanksgiving meal (aside from stuffing), cranberry sauce. This is a great recipe for cranberry sauce that I found in Sunset Magazine a while back. While it does use some spices and earl grey tea, it provides a subtle background of flavor that makes this cranberry sauce really well balanced, not too sweet, not too tart and with a lingering flavor of a hint of spice and tea. Give it a try!


I made a large batch a while back and canned it so I'm ready to go for the year! It's very easy to can, and you would do it the way you can any normal jam. There is enough sugar that things don't get to technical or require a pressure canner. In one of my upcoming posts I am going to blog about how I make my applesauce and will go more in depth about the steps I go through when I can a product. Until then, make a batch of this and enjoy all the great food this time of year brings!

Tea Spiced Cranberry Sauce (taken directly from Sunset Magazine)

In a 4-quart pot over high heat, combine:
1 3/4 cups water
2 1/4 cups sugar
4 whole cardamom pods
3 whole star anise
3 cinnamon sticks
Cover and bring to a boil, then reduce heat to medium-low and simmer 10 minutes.
Add:
5 Earl Grey tea bags
and simmer exactly 2 minutes. Remove tea bags and spices with a slotted spoon.
Add:
8 cups whole cranberries (about 2 1/2 bags, fresh or frozen).
Increase heat to medium-high and simmer, stirring often, until cranberries soften and split their skins and sauce thickens, about 12 minutes. Remove from heat and let cool to room temperature before serving (the sauce will thicken further as it cools). Or cover and refrigerate up to 4 days.

Sunset, NOVEMBER 2006

*Notes* I have found this lasts quite a bit longer than 4 days in the refridgerator. Before straining out all the tea bags and spices, make sure to taste the soultion, in the past I have found that 2 minutes isn't long enough and will let it sit (with the heat off) for 10-15 minutes or longer, until it's fairly strong tasting and then I'll proceed with the rest of the recipe. I have also tried this with other black teas (can be loose leaf) and have had great results.

Wednesday, November 19, 2008

Strata- variation

I love the idea of the vegetable strata I posted a few weeks ago and recently tried another version of this. I wanted to share this because it's completely different than the previous version. This recipe is more of an idea and you can really use whatever you have lying around. In this version I had some beautiful rainbow swiss chard that I needed to use up and I had also brought home some rye bread that had been sitting on the counter for a few days, and these turned out to be great components for the latest strata. In the previous recipe it made a full 9X13 pan which can serve at least 8, but this time, not only did I not have enough ingredients for a full recipe, but I also didn't want as many leftovers.


Rye Strata with Swiss Chard and Golden Raisins

There aren't any measurements this time, I started with an 8x8" pan and layered the bottom with thin slices of rye bread. Then I spread a layer of swiss chard that had been sauteed with some diced onion and seasoned with salt and pepper. On top of that I sprinkled some golden raisins and then repeated the layering process ending with another layer of bread. I cut the custard recipe in half- 1 cup of milk to 2 eggs and seasoned that with some more salt, pepper and nutmeg then I mixed in about 1/4 cup of grated Parmesan. I baked this at 375 until it felt firm in the middle. Use this as an inspiration for creating your own versions. I will continue to post more successful variations!

Sunday, November 2, 2008

Fried Green Tomatoes


As our summer winds down, I find myself with a tomato plant that was in the process of getting a second wind, but not enough sun and warmth to ripen the green tomatoes... what better time to try out fried green tomatoes? I had never had them before, but had heard many swoon over how good they were. There is rarely something fried that doesn't taste good, so I thought I would give it a shot. I had also had some bacon cheddar bread that I brought home so I was beginning to envision, Fried Green Tomato BLT's. After all is said and done I don't think a fried green tomato should be held back in a sandwich, but rather left to be on their own, because they are THAT good! They are firm and slightly tart, but the frying brings out an addictive sweetness and the breading with some panko and cornmeal gives a delicate crunch. Yum! The rest of the post will be just about frying the tomatoes and not the sandwich itself. I really liked how the pictures came out though and wanted to post them all.

The following directions are what you could call standard breading procedures you could use to fry all sorts of vegetables, chicken, ect. The first step is to dredge the item in flour, then into an egg wash, and finally into its outer coating, may that be cornmeal, panko or other bread crumb or perhaps a batter... The first coat of flour sticks easily to the product but also guarantees that when dipped in the egg wash, that too will stick which you need so what ever it's finally rolled in will also evenly adhere to the product. While this may seem tedious, it will result in an even crunchy coating over the product being fried, well worth the extra steps.


Fried Green Tomatoes:
You want to start with a high quality flavorful tomato that is green because it hasn't fully ripened yet. Do not start with a tomato that is green even when ripe- those aren't the kind of "green tomatoes we are talking about. Evenly slice the tomato into 1/2" slices. You want to make sure they are thick enough to stand up to the breading and frying without breaking, but not so thick that they don't have a chance to fully cook through. After they are sliced, sprinkle salt and pepper on both sides of the tomato. The key in flavorful fried products is to season every step, not just at the end by sprinkling on salt. After the tomatoes are sliced and seasoned, begin to assemble your breading station. Start with three containers, or bowls that will easily accommodate your largest tomato slice being able to lie flat in the bottom. In the first bowl you will have your flour. Start with about 1 1/2 cups of flour* add about 1/2 tsp salt and 1/2 tsp pepper to the flour (and maybe a little cayenne or paprika if you want things spicy). The next dish will have your egg wash. Start with 3 eggs and about 1/4 cup of milk. Beat together until all the egg is broken up and the milk is mixed in. The last container will have 2 cups of panko (a japanese bread crumb)** and about 1/4 cup cornmeal with 1/2 tsp salt and 1/4 tsp of pepper. After the breading station is set, start heating up some oil. I used my cast iron skillet but any heavy duty pot will do. Pour enough oil so that it comes about 2" up the side of the skillet. Heat the oil to about 365 degrees. Keep an eye on the oil to make sure it doesn't get really hot by using a fry thermometer or a candy thermometer. As your oil is heating, set up the station. As you can see in the picture above, I have the containers lined up- flour first, then egg, then panko. Start breading your tomatoes, dredge in flour, shaking off the excess. Dip into the egg wash, shaking off any excess and place in the panko conainer. Gently turn it over and shake the dish slightly to make sure everything gets coated. Be careful to not disturb the breading as you place it from dish to dish and as you finish set them on a cooling rack. I would advise getting them all breaded before frying. Then place that rack close to the stove and fry about 4 slices at a time (depending on how big your skillet is- if you can hold more, add a few more). When you are adding cold product to the oil the temperature drops dramatically, so make sure you don' t crowd the pan, and you may want to temporairly turn up the heat to let the oil recover.


After they become golden brown on the first side, flip them over and continue frying until golden brown on the second. After they come out of the oil have a paper lined sheet pan ready for them to sit on (as pictured down below). Don't put more tomatoes in the oven until the oil has gotten back up to the right temperature. Serve right away, plain or with maybe an herbed aioli? Enjoy!


Now that you have the basic breading procedure feel free to play around, the final breading doesn't always have to be panko, it could be all cornmeal or coconut or a mixture of things, the sky is the limit!

* this was written with the amounts to fry enough slices from about 4 medium large tomatoes. If you are frying more, increase the breading amounts.
** Panko is fairly easy to find these days, it is superior for frying because it doesn't easily get soggy. You could easily substitute dried bread crumbs for panko.