Sunday, March 29, 2009

Ricotta Dumplings

Ricotta Dumplings


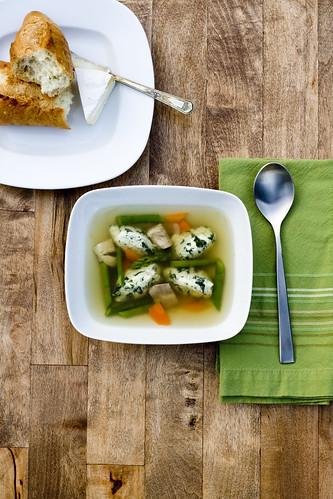
For my post I have used these ricotta dumplings in a soup, but they could easily be sauteed in some butter and topped with tomato sauce or also used as a ravioli or tortellini filling. Feel free to play around with the vegetable additions, as I would imagine a pumpkin or other squash would go really well.

Ricotta Dumplings (makes about 24 large sized dumplings)

1 lb ricotta
2 eggs
1/2 cup finely grated Parmesan (feel free to use another hard cheese)
3/4 cup finely chopped spinach, well drained (feel free to use frozen)
10 cloves of roasted garlic (about 2 tbs mashed up)*
3/4 tsp salt
1/2 tsp pepper
1/4 tsp finely chopped lemon zest
1/4 cup flour
1/4 tsp freshly grated nutmeg

* to roast garlic, you can use a whole head or just as many cloves as you need, and wrap it in foil and bake in a 375 degree oven for approximately 40 minutes to an hour until very soft when touched. Either squeeze out the garlic from the skin or you can also peel the cloves to ensure maximum yield.

For the dumplings, mix everything together in a bowl. This can be made in advance before cooking, or once the dumplings are cooked you can hold them overnight in a covered container. To cook the dumplings, bring a large pot of salted water to a boil and drop desired sized dumplings into the water and turn the water down to a simmer for 5 minutes. Make sure when forming dumplings (usually by using two spoons or a small scoop) that they are fairly tightly compact, because with the addition of the spinach the dumplings can fall apart if too loosely formed. Only cook about 6-10 dumplings at a time, so you don't crowd the pot. When done, using a slotted spoon, transfer dumplings to a bowl or plate. Bring the water back to a simmer, add the next batch of dumplings. I have put these into a chicken soup but you could also just saute them over high heat with a little butter or use as a filling for ravioli. If using in soup, I would keep them separate until serving, as storing the dumplings in the soup will probably make them begin to break down.

Monday, March 16, 2009

Lemon Curd

Traditionally lemon curd is served with scones. It has so many more uses than just an accompaniment to scones. Even just by the spoonful, it can be justified! It is so mouth wateringly addicting. It's just the right amount of acid mixed with sweet, and a wonderfully creamy and smooth texture. Even my husband who isn't a big fan of anything lemon kept coming back for more! If you've never made lemon curd before, it's very simple and so rewarding. As for other uses, you can put it into a tart shell (great for mini tartlets and bake it at 350 just for about 10 minutes to set the top) and serve it with some berries and freshly whipped cream for a great summer dessert. As strawberries are in season it makes a wonderful addition to a shortcake. Fold some lemon curd into some freshly whipped cream before topping the shortcakes. You don't have to stick with just lemon either. You can use different juices in place of the lemon. Passion fruit is a personal favorite of mine. You can do a combination of lemon and lime, or if you have some key limes, they would make a wonderfully fragrant curd. Even though grapefruits are on their way out of season, they are also a wonderful choice. Curd can be a great filling for cakes, or an equally welcome accompaniment to something like an anglefood cake along with some fresh berries. Hopefully I've inspired you enough to give it a try.

Lemon Curd


Lemon Curd (makes about 3 cups)
1 cup freshly squeezed lemon juice (from about 5 lemons)
Zest of 2 lemons
3 large eggs
5 large egg yolks
1 3/4 cup sugar
5 tablespoons unsalted butter


There are two ways to make lemon curd, by putting a heatproof bowl over simmering water (indirect heat) or just in a pan on direct heat. The second option, I would recommend to anyone who has had experience cooking custard based sauces (like creme anglaise)*. Using a mixing bowl over the pan of simmering water is the safer method(to prevent your eggs from scrambling). Either way you choose, mix the eggs with the sugar, add the lemon juice and zest whisking to combine everything in a heatproof bowl. You want to stir with a rubber spatula continuously until it thickly coats the spatula or until you can see that it has thickly coated the side of the bowl. It should have the consistency of a thin pudding. Strain the curd into a clean bowl (to catch any small bits of cooked egg) and whisk in the butter. Cover with plastic wrap and cool. This mixture can be kept in the refrigerator for a few weeks.

*If cooking the mixture over direct heat, mix the ingredients into a thick bottomed pan and cook over very low heat, using a plastic spatula to stir, making sure to get all parts of the pan.

Lemon Curd

Sunday, March 8, 2009

Chocolate Chip Cookies

Chocolate Chip Cookies-Edit


These might have been the first thing I ever learned how to make (it was either these or pancakes... I'm not sure). I remember asking my grandmother to send me the recipe for her chocolate chip cookies. I might have been around 9 when I had requested the recipe and have never stopped making them since. I can remember going away to summer camp for the summer (my mom was the camp nurse which is why we went all summer) and I would bake a few batches of these cookies for my dad whom would be all on his own for the summer. He would put the cookies into the freezer and carefully ration them until I returned to make more. These are my favorite chocolate chip cookies, they are loaded with oats which I love, and they are crispy after they come out of the oven, but they soften over time and become a little more chewy but they are equally as good. Even if you don't normally bake with whole wheat pastry flour, I encourage you to go to the grocery store and pick some up. I usually find it in the bulk bins in the health food section. The whole wheat is great in these cookies, it doesn't feel like a compromise but rather a preference. I think the whole wheat flavor matches the oats and chocolate so well, not to mention it offers some added health benefits, although all the butter and sugar would kind of cancel that out.

Chocolate Chip Cookies makes about 48 cookies

1 cup butter (2 sticks) room temperature
3/4 cup brown sugar
3/4 cup white sugar
2 eggs at room temperature
1 tsp vanilla
2 cups whole wheat pastry flour
2 1/2 cups old fashioned oats (not quick cooking)
1 tsp baking powder
1 tsp baking soda
1/2 tsp salt
1 12 oz bag of chocolate chips or your favorite chocolate chopped into small pieces


Pre heat the oven to 375 degrees F. Cream together the butter and sugars, if mixing by hand cream until light and fluffy, at least 8 minutes. If using an electric mixer, use paddle attachment on medium speed and cream for 5 minutes. Add the eggs one at a time, making sure the first is completely incorporated before adding the second. You can add the vanilla along with the eggs. Take two cups of the oats and put them into a blender or food processor to grind them to a flour. Add the rest of the dry ingredients, including the 1/2 cup of whole oats and mix everything together. Stir into the butter mixture, adding the chocolate chips/ pieces before the flour gets completely mixed in. Scoop into rounded tablespoon fulls and put onto a greased or parchment lined sheet pan. Gently flatten the cookies slightly so they spread properly. Bake for 12-15 minutes rotating the pan half way through baking. Bake until the cookies are a golden brown. Cool on a cooling rack and then store in an air tight container.

Wednesday, March 4, 2009

Avocado Tomatillo Dip

Avocado Tomatillo Dip


Here is a quick and very addicting dip. It's a lot like a guacamole, but has the addition of tangy tomatillo's that creates a creamy, slightly tart dip that has uses well beyond serving with chips. I can't seem to stop eating it. The flavors are perfectly balanced which makes it very addicting. It makes a great spread for a sandwich, and I would imagine a perfect sauce for grilled fish or a condiment for tacos. I discovered this recipe in Cooking Light Magazine- for two full cups of dip it only uses one avocado and some sour cream which helps to cut down on the fat, but to taste it, you would have no clue! With the addition of the tomatillos, this prevents the dip from turning brown for a few days!

Avocado Tomatillo Dip (adapted from Cooking Light)
Makes about 2 cups

1/2 pound tomatillos (about 5 large)
1/4 cup chopped onion
2 tablespoons chopped fresh cilantro
1 teaspoon finely chopped seeded jalapeƱo pepper (or more if you want it spicier)
1/2 teaspoon salt
Juice of 1/2 a lime
3 TBS sour cream (low fat, fat free, regular- up to you)
1 ripe peeled avocado, seeded and coarsely chopped

Peel the husks off of the tomatillos, place them in a sauce pan, cover with cold water and bring to a boil. Turn the heat down and simmer for about five minutes, until the tomatillos are tender. Drain and cool. Place into a food processor, or blender and add the onion, cilantro, jalapeno, salt and lime. Turn on and process until smooth. Add in the sour cream and avocado and process until smooth. Taste and add more salt and lime juice as needed. Since this doesn't turn brown very quickly it this can easily be made ahead of time and will last for approximately 5 days - if you can keep it around that long!

Sunday, March 1, 2009

My Favorite Brownies

Brownies


One of the sweets I remember from my childhood is the homemade brownies my parents used to make. For a long time, none of the brownies I had ever really compared to what I remembered as the perfect brownie that my parents made. When I made the recipe my mom had given me a few years back for the first time in a long time, I found it too sweet and the only chocolate source was also Ghiradelli Hot Cocoa mix- not enough chocolate flavor for me. I used to think what made these so special was the malted milk powder that was added. Over the last few months, in developing my hot chocolate mix, it struck me- it wasn't the malt, it was the milk powder! Hot chocolate mix is pretty much two parts milk powder to one part cocoa powder and one part sugar. The sugar and cocoa powder were already in the recipe I was working on, with the addition of some milk powder I got the flavor and texture I remember. The milk powder adds some of that malted flavor, and gives a nice chewy fudgy texture to the brownies. I also have added some bittersweet chocolate along with the cocoa powder, which isn't normal- usually it's just one or the other. This gives the brownies a great well rounded chocolate flavor, make sure you use high quality chocolate and cocoa powder or they won't be your favorite brownies! After I get the variations nailed down, I'll post some other options beyond plain brownies... peanut butter swirl, cheesecake, raspberry hazelnut, coconut macaroon... oh the opportunities are endless! Try these out and let me know what you think!

Brownies ( makes about 16 medium sized squares)

4 oz bittersweet chocolate
4 oz butter
1 1/4 cup sugar
3 eggs
1 TBS vanilla
1/2 cup non fat dried milk powder
3/4 cup cake flour (I have also used whole wheat pastry flour with great results)
1/2 tsp salt
3/4 tsp baking powder
1/2 cup cocoa powder

Pre heat the oven to 325 degrees F. Over a pan of boiling water (or in the microwave) melt the butter and chocolate together. After it is completely melted add the sugar, mix, and add the eggs at once. Stir until they are mixed in, add the vanilla extract, and then the milk powder. Sift all the dry ingredients together and add to the chocolate butter mix and stir just until combined. Pour into a greased 9x13" pan and bake until when a skewer is inserted into the middle it comes with crumbs attached. Be careful not to over cook them!