Wednesday, December 24, 2008

Dinner Rolls

_MG_0021


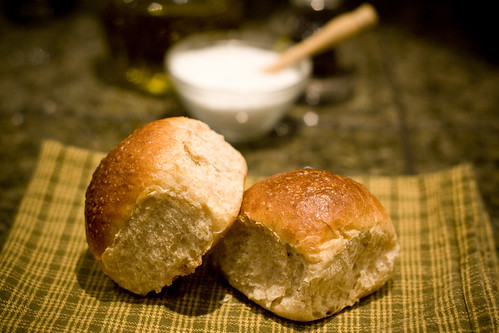
When I think of dinner rolls, I think of a dough enriched with some butter to make the bread tender and some sugar to sweeten it a bit. These rolls made with part white flour and part whole wheat flour, a very mild and light bread- a great dinner roll. This dough also works well for making stuffed buns. You can stuff them with all sorts of things, ham and cheese, or caramelized onions and maybe some roasted butternut squash... anything you could possibly think of! In an upcoming blog I'll come up with an example or two for you. For now, here is the recipe for the rolls, sorry it may be a little late for Christmas dinner, but once all of the excitement has died down give them a try! I am making them tonight for Christmas dinner tomorrow and have made the dough but am letting it rise overnight. Tomorrow I'll shape, proof and bake the rolls fresh for dinner tomorrow. These can easily be done in one day- in about 3 hours or it can be broken up over two days. Or you can make the rolls ahead of time and then freeze them.

Dinner Rolls (makes about 18 rolls)

1 1/2 cups (360 g) water, about 75 degrees
1/3 cup and 4 tsp (30 g) non fat dried milk powder
1 3/4 cup (225 g) whole wheat flour
3 cups (400 g) bread flour
2 1/2 tsp (12 g) salt
2 3/4 tsp (8 g) instant yeast
1/4 cup (60 g) sugar
1/4 cup (60 g) butter, room temperature

Mix the water and milk powder in a bowl. In another bowl mix all the dry ingredients together, stirring to make sure everything is equally distributed. Add the water and butter to the dry ingredients.
To Mix by hand:
Grab the dough and start squeezing the dough through your hand and keep incorporating everything until you no longer see any dry ingredients. As you are grabbing the dough, focus on the spots where there are dry ingredients still visible. After it is all mixed in, let it sit either in a bowl covered or on the counter with the bowl over the dough (to prevent it from getting dried out). Let the dough rest and hydrate for 5 minutes then knead the dough until it's smooth and developed.
To Mix on a mixer: put all the ingredients into a mixer and mix on low speed for 10 minutes.
After the dough is developed put it into a clean greased bowl and let it rise for 45 minutes (or if letting it rise overnight, let it sit out for 30 minutes, then re round the dough and put it into a covered bowl and into the refrigerator. The next day take the dough out, portion, round and let the dough proof.). After 45 minutes, turn the dough onto the counter and gently pat down and fold the four sides in and turn the dough over and let rise once more until the dough has doubled in size (about 30-45 minutes depending on the temperature in the kitchen). Turn the dough out on the counter and either using a scale portion out the dough to 2 oz pieces, or you can just eyeball it and cut them into 18 equal pieces. Pat the dough into a flat disk, and then gather all the edges up, and pinch to make a tight seam. Putting the seam on the counter, cup your hand over the dough and roll in a small circle to tighten the top of the dough and seal the seam. Place them on a greased sheet pan (or on a parchment lined sheet pan)and then cover them with a cloth or some plastic wrap (loosely so the dough has room to rise) and then let them rise until they are double in size. If you want them to be shiny, brush them with egg wash (a mixture of egg and a splash of water well mixed) before baking. Bake at 375 degrees for about 20 minutes or until the rolls are a dark golden brown. After they come out of the oven put them on a cooling rack to cool. Have a wonderful holiday season!

Sunday, December 21, 2008

Thumbprint Cookies

_MG_0007


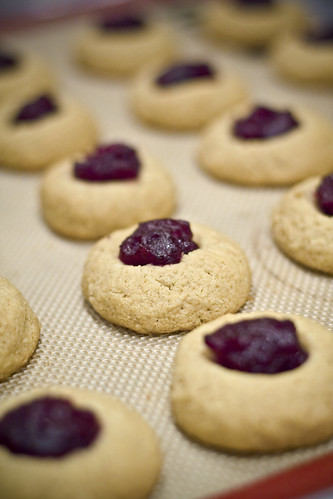
This is a simple recipe with lots of room for variations. One of the reasons I love thumbprint cookies is because I love jam on anything and everything! In this particular batch I made them using a cranberry jam I recently made. I have also made these cookies by hiding a chunk of chocolate inside the cookie and leaving the thumbprint out all together! You could also put that piece of chocolate on top in the middle of the thumbprint maybe with some raspberry jam? Yum! The possibilities are endless. You could leave out the coconut and substitute cornmeal with a apricot jam perhaps? There is some cinnamon which could be left out or joined by some other spices and maybe some plum or fig jam in the center? Another option is to leave the jam out when baking and then after they come out of the oven fill them with lemon curd. Or what about substituting 1/4 cup of flour for cocoa powder and then fill the centers after they come out of the oven with caramel? I just may have to try that out next time! Feel free to leave the almond meal (finely ground almonds) out or substitute for another nut. If you don't have any whole wheat pastry flour feel free to use a regular all purpose flour.

Thumbprints (makes approximately 2 dozen)

6 TBS butter
1/3 cup brown sugar (or white sugar if you want)
1 egg
1 cup whole wheat pastry flour
1/2 tsp cinnamon
1/2 tsp baking powder
1/4 tsp salt
1/2 cup almond meal (finely ground almond- if you are unable to find it you can grind your own in the food processor. Feel free to substitute another nut)
1/2 cup unsweetened coconut


Pre-heat the oven to 350 degrees Fahrenheit. Cream the butter and sugar together until light and fluffy. Add the egg and mix until completely emulsified. Mix the flour, baking powder, cinnamon, and salt together and then mix into the butter mix. Add the coconut and almond meal and mix until combined. Using a tablespoon or small scoop portion out the dough. Roll to a round ball using the palms of your hands and place on a sheet pan lined with parchment or lightly greased. Using your thumb, make a large deep indent in the middle of the cookie (as it cooks this will rise up slightly so make it fairly deep and wide. Bake for 10-12 minutes until almost cooked through. If the center has risen too high you can push the center down a little, and then spoon in enough jam to fill the center. Put them back into the oven for 5-7 minutes, until they are golden brown. Alternatively you can bake them all the way through and then fill them with jam afterward. By baking the with jam for the last half of the baking, it helps the jam to gel and stick inside of the cookie. Keep covered and they will last for a week, if you can keep them that long!
You can also freeze the dough in the balls (with indents already made) on a sheet pan until hard and then place them in a zip lock bag to bake as needed. They can go frozen right into the oven. The baking time will increase slightly. Before adding the jam, the cookies should be pretty much cooked through, but won't have much color and then the second baking will be done after they turn a light golden brown.

Sunday, December 14, 2008

Applesauce & A Quick Lesson in Canning

What's a girl to do with 2 20 gallon pails of apples? I did pick them, so I had a few things in mind, but the work never hits you while you are picking apples only when you get home and start unloading the car and filling up your kitchen with apples! Ever since I was a child I have been eating fresh homemade applesauce- nothing compares. Every Friday night I would peel apples that would go into a crockpot for the night. Saturday morning we would wake up to fresh applesauce and make pancakes to go with them. To this day pancakes simply aren't as good if they don't have warm applesauce to go with them. Nobody ever warns you as a kid that the things you eat will follow you into adult hood whether you like it or not!
As I discovered how easy and rewarding canning is, one of the first things on my list was applesauce (right above apple butter). I try to can enough applesauce to last me through out the year, but it never lasts that long. Applesauce is simple, and it's easy to find good apples so who says you can't make another batch? The apples should be sweet and full of flavor, if they are not as sweet or flavorful, you might have to resort to some sugar for flavor. Golden delicious work really well, but even better is a mix of a few different kinds. I have made applesauce many different ways and only recently have discovered absolutely hands down, the easiest way.

Homemade Applesauce
All you have to do is wash your apples and cut out the cores- don't worry about the peels. Chop them up into 4-8 pieces depending on the size of the apple. Put them into a dutch oven (a large oven safe pot with a lid) or even a roasting pan covered with some foil. Add a little water just to cover the bottom. Careful, too much water will dilute the flavor of your applesauce. After the pan is full of apples (and you can fill it to the top) put it into the oven at 300 degrees until the apples are so tender they fall apart with the poke of a spoon. Depending on how large and how full your pot was this will be anywhere from 45minutes to 2 hours. I usually like to check on them once or twice and give them a stir. Once they are tender, take the pot out of the oven and turn it off. Let the apples cool briefly and then using a food mill (this piece of equipment is necessary unless the batch is small then you can push the apples through a fine mesh sifter) process all the apples through and what you should be left with is little more than all the skins! At this point you have two options- freeze the applesauce or can it. Freezing works well but I prefer to can my applesauce (there are too many things already that I freeze to put up for the year).

A Quick Lesson In Canning

So the second part of my post is dedicated to how to can. I had eluded to it in my earlier recipe for the cranberry sauce, that I would be following up with some how -to's to show you how easy canning really is.
Canning is one of those mysterious things in the culinary world that puts everyone in two groups. There are the people who think that canning is very complicated and involves lot's of special equipment and expertise, and then there is the other half that may have thought that at one time but have come to realize that canning runs the gamut of complication. It only needs to be as complicated as you make it... if you want to keep things simple, can items that don't require much work or specific pH's . What things are easy to can? Anything high in acid or sugar. Like jam and pickles- these are the things that are very widely canned. Both of these ingredients make for a unfriendly environment for bacteria to live... There are other things like vegetables or legumes or meats that have low pH and high protein contents that are very inviting for various bacteria and require a little more education and equipment, namely a pressure canner. For items with a lot of sugar or a high pH a water bath canner (ie a large pot with water a inch above the jar) works beautifully.
Investing in a few tools makes the job so much easier. That would be a canning pot with a rack (you don't want the jars directly on the bottom of the pot), and some tools to help maneuver the jars in and out of hot liquid. and then of course the canning jars, tops and rings (to hold the tops on). The jars you can keep and reuse, same with the rings. It's just the lids you need to use a fresh one each time you can (because of the rubber seal that needs to seal to the jar). If you are at all familiar with estate sales, these can be great places to find all the canning supplies you'll ever need, or second hand stores...
Be organized! Clean your kitchen, have everything ready to go before the filling is done and needs to be filled in the jars immediately. This includes giving yourself enough room to work comfortably. This may mean temporarily cleaning your counters off, but this is one of the keys to smooth and easy canning that will keep you coming back for more.
Realize that your first few times canning may be slow and a little awkward, but if you stick with it soon you can do it with your eyes closed (well almost). It's like any new recipe, the first time or two you spend a lot of time going back and rereading the steps to make sure you are doing it correctly and you have everything right. But after it's become a favorite and you've made it several times you find yourself not even looking at the recipe at all.... the same will be for canning. With that said, start out small. I made the mistake of doing marathon canning my first time and I had several different things to can and a lot of each item and I spent ALL day in the kitchen and was overwhelmed and exhausted by the end. It will be a lot more enjoyable as you are getting the hang of things if you stick to one item and only make several quarts (5-7).

Before you can a large batch of something (like tomato sauce) try the recipe and method out first and make sure you like it before you are stuck with 10 quarts of it. Yes, I am speaking from experience! Not every recipe is created the same!

So, to begin, get your applesauce started. Once you fill your jars, you want everything to be hot, so when you put it in the water bath canner (which needs to be back up to a boil before the processing time can start) the hotter the jars, the quicker the water will come back to a boil. There are many different ways to sterilize jars, if you have a dishwasher with a short/small cycle on it, by all means put the jars in there and time it so they are ready and hot when the applesauce is. Or if you're like me and maybe your dishwasher is loud and takes a while, you can sterilize the jars in boiling water. I'll usually wash them with hot soapy water first since most of my jars reside in the garage for a better part of the year, then I'll fill up my canning pot about 2/3's of the way up and bring that water to a boil (we are talking about a HUGE pot of water that usually takes up two burners so don't underestimate the amount of time this will take to boil). After it's boiling, I'll put my jars in the water and let them gently boil for 10 minutes. The rings, need to be washed in hot soapy water and dried, and you can set those aside until you need them. The lids need to stay warm until they are used, so what I'll do about 10 minutes before I can I'll bring a small pot of water to boil and take the pan off the heat and place the lids in there until they are ready to be put on the jar. Then when the applesauce is done and has been through the food mill I'm ready to put it in the jars. If it will be a little while until you actually put the applesauce in the jars, put it in a pot and keep it warm on the stove or in the oven. When everything is ready and you have everything in place you can take the applesauce off the heat. Using a ladle and a funnel (wide mouth for canning) take the jars out of the water, emptying all the water from inside the jar back into the pot, fill the jars up leaving 1/4" of head space at the top*. Make sure the rim is ABSOLUTELY clean- any little particles of food will prevent a proper seal of the jar. Every thing is set and ready to go.


Timing is something that takes practice but when you do have it down, canning is a very easy and smooth process.

Everything is in a line, the the pot at one end, then the unfilled jars, then the rings and lids... all in the order in which they are needed. It keeps everything clean, neat and accessible.

After all the jars are full, wipe around the rims of the jars with a clean cloth and place the lids on the jars. Top each with a ring and tighten lightly. After all the jars are done, pull the rack out of the canning pot, fill with the jars and put back into the water. Let the water come to a boil then time it for 20 minutes (for canning quarts, pints will have a slightly less processing time). Make sure it is a gentle rolling boil. After the required time, take the jars out carefully making sure to keep them right side up, and place them on the counter. Let the jars cool undisturbed until you hear a pop (this will be the jar cooling off and creating the suction which will keep all the oxgyen out of the can and seal the jar). If you don't hear a pop, and when you try to pry the lid off (gently) if it, it comes off, you can either keep that jar in the refrigerator or reprocess the jar again. I would empty out the contents and heat it back up while sterilizing the jar and start the process all over again. I would only go to this trouble if a number of my jars were unsuccessful in the seal. Otherwise, keep it in your refrigerator or freeze it in a plastic bag. Make sure to label and date your product, so 6 months down the road you know what it is and which jar to use first (the oldest!).
Hopefully this has taken some of the mystery out of canning and I have inspired you to try it for your own. There is nothing like going to garage for a jar of summer peaches or applesauce and to open it up, and for it to taste as good as the day it was made or the day the peach was picked! It's a great way to eat locally all year round but be spoiled by summers bounty in the cold dark days of winter!

www.pickyourown.org is the website that I get most of my canning information and guidance from. Here is the link for applesauce in case some of this information is very unfamiliar or you need to see some visuals for the tools that are helpful for canning- this page can be a great resource

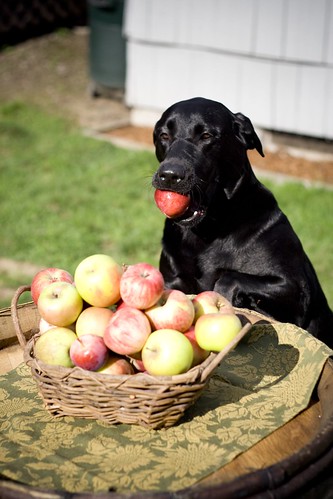
Puma choosing his apple!
Couldn't resist adding this picture of our loving lab- Puma who for the record we encouraged to jump up and help himself to an apple- normally he is very polite and will not touch human food!

* head space will vary for different products. It's important to follow the recommendations. Too little room and your product could come out of the can before it seals and too much air or headspace left inside can leave an inadequate seal. I've been off (too much room) before by a 1/4 " an inch or so without a problem, but I have put too much in before and it bubbles out of the jar as it is processing... not good.

Saturday, November 29, 2008

Daring Bakers Challenge- Caramel Cake with Caramelized Butter Frosting

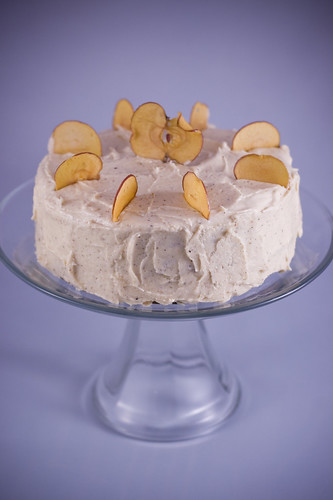
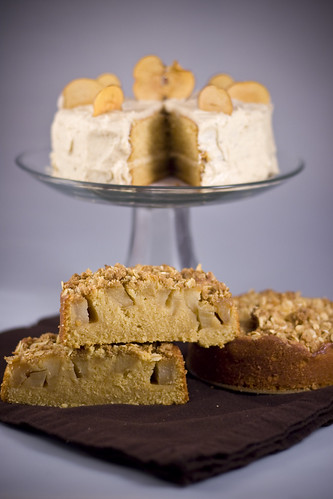
After a few months break from the Daring Bakers Challenges, I am back with the November challenge of the Caramel Cake. I was intrigued by this recipe for several reasons, the caramel sauce that went into the cake itself and also the caramel browned butter frosting. Overall the cake was great, nicely balanced- not too sweet and the cake had a wonderful texture. With only my husband and I around, I was hesitant to make an entire 9" cake so I used some small cake pans to not only make the cake for the challenge but play around with some other ideas that came to mind. With the rest of the batter I came up with a wonderfully simple caramel poached apple cake finished with a little strussel on top requiring very little else. I'll share the details at the end of the post. As you can see I was inspired by the apple theme and also used apple chips to decorate the top of the cake.

Caramel Cake with Caramelized Butter Frosting


Dolores of Culinary Curiosity co-hosted this months challenge with Alex of Brownie and Blondie and Jenny of Foray into Food. The recipe was given to us by a fellow blogger Shuna Fish Lydon at Eggbeater

CARAMEL CAKE WITH CARAMELIZED BUTTER FROSTING
as published on Bay Area Bites

FOR THE CAKE:
10 Tablespoons unsalted butter at room temperature
1 1/4 Cups granulated sugar
1/2 teaspoon kosher salt
1/3 Cup Caramel Syrup (see recipe below)
2 eggs, at room temperature
splash vanilla extract
2 Cups all-purpose flour
1/2 teaspoon baking powder
1 cup milk, at room temperature

Preheat oven to 350F

Butter one tall (2 – 2.5 inch deep) 9-inch cake pan.

In the bowl of a stand mixer fitted with a paddle attachment, cream butter until smooth. Add sugar and salt, and cream the mixture until light and fluffy.

Slowly pour room temperature caramel syrup into bowl. Scrape down bowl and increase speed. Add eggs/vanilla extract a little at a time, mixing well after each addition. Scrape down bowl again, beat mixture until light and uniform.

Sift flour and baking powder.

Turn mixer to lowest speed, and add one third of the dry ingredients. When incorporated, add half of the milk, a little at a time. Add another third of the dry ingredients, then the other half of the milk and finish with the dry ingredients. {This is called the dry, wet, dry, wet, dry method in cake making. It is often employed when there is a high proportion of liquid in the batter.}

Take off mixer and by hand, use a spatula to do a few last folds, making sure batter is uniform. Turn batter into prepared cake pan.

Place cake pan on cookie sheet or 1/2 sheet pan. Set first timer for 30 minutes, rotate pan and set timer for another 15-20 minutes. Your own oven will set the pace. Bake until sides pull away from the pan and skewer inserted in middle comes out clean. Cool cake completely before icing it.

Cake will keep for three days outside of the refrigerator.

FOR THE CARAMEL SYRUP:

2 cups sugar
1/2 cup water
1 cup water (for "stopping" the caramelization process)

In a small stainless steel saucepan, with tall sides, mix water and sugar until mixture feels like wet sand. Brush down any stray sugar crystals with wet pastry brush. Turn on heat to highest flame. Cook until smoking slightly: dark amber.

When color is achieved, very carefully pour in one cup of water. Caramel will jump and sputter about! It is very dangerous, so have long sleeves on and be prepared to step back.

Whisk over medium heat until it has reduced slightly and feels sticky between two fingers. {Obviously wait for it to cool on a spoon before touching it.} ***

Note: For safety reasons, have ready a bowl of ice water to plunge your hands into if any caramel should land on your skin.

FOR THE CARAMELIZED BUTTER FROSTING:

12 tablespoons unsalted butter
1 pound confectioner’s sugar, sifted
4-6 tablespoons heavy cream
2 teaspoons vanilla extract
2-4 tablespoons caramel syrup
Kosher or sea salt to taste

Cook butter until brown. Pour through a fine meshed sieve into a heatproof bowl, set aside to cool.

Pour cooled brown butter into mixer bowl.

In a stand mixer fitted with a paddle or whisk attachment, add confectioner's sugar a little at a time. When mixture looks too chunky to take any more, add a bit of cream and or caramel syrup. Repeat until mixture looks smooth and all confectioner's sugar has been incorporated. Add salt to taste.

Note: Caramelized butter frosting will keep in fridge for up to a month. To smooth out from cold, microwave a bit, then mix with paddle attachment until smooth and light.

This is the variation I had mentioned up at the top. I took some of the leftover caramel syrup and mixed it with equal parts apple juice and added 1 tsp of mulling spices to the pan and gently poached some apple quarters until they were tender but still firm. Ideally these should sit in the poaching liquid overnight or at the very least allowed to sit in the poaching liquid until both the pears and liquid are completely cool. After that I put some cake batter into the pan (filled about 1/3 of the way up the pan) and then placed the apples on top and then sprinkled some strussel on top (optional). I made one cake without the strussel and worked out as well. With the fruit it no longer needed the frosting making it a little more casual and not quite as sweet. This cake was definitely a keeper and the frosting as well!

Caramel Cake with Caramelized Butter Frosting


***I found that I may not have cooked the syrup down quite as far as I should have, I found that the bottom of my cake was a little dense and I have a feeling it may have been from a little too much liquid in the batter. When I was boiling my syrup I temped the syrup at 220 F and next time I would go up to 224 F and I think that would eliminate the problem. For those without a thermometer just follow the original directions using your fingers as your guide!

Tuesday, November 25, 2008

Wild Mushrooms and Leeks with Pumpkin Polenta

Here's a lighter meal that shows off the beautiful flavors of fall, I know I'm a little late but should you come across some wild mushrooms here is a great way to use them. Even if you don't have any wild mushrooms or want to bulk it up with some less expensive alternatives, cremini and or portabello mushrooms would make a good stand in. The pumpkin polenta is subtle but slightly sweet and a great way to sneak even some more vegetables into your dish. This makes a satisfying hearty supper that can be served on it's own or paired with... maybe some leftover turkey?


Wild Mushroom and Leeks (adapted from Cooking Light November 2008)
(6 main dish servings)

2 Tbs butter
1 1/2 cups thinly sliced leek
12 oz wild mushrooms sliced
2 tbs chopped fresh Italian parsley
1 tsp fresh sage finely chopped
3 tbs dry sherry
salt and pepper to taste

Saute the leeks in the butter over medium high heat. After the leeks begin to soften add the mushrooms and cook until all the moisture has evaporated. Add the sherry and the herbs. Season with a sprinkle of salt and pepper to taste.

Pumpkin Polenta

1 cup polenta
4 cups of water or stock (vegetable or chicken) or a combination of both
1 1/2 cups pumpkin puree
1/2 cups Parmesan
salt and pepper to taste

Combine the polenta and water and or stock in a medium sauce pan and bring to a boil. Turn the heat down and let simmer for 15 minutes or so until the grain is soft and fully cooked. Keep and eye on it and stir every few minutes. After the polenta is done cooking keep the heat on low and add the pumpkin puree, Parmesan and salt and pepper to taste. Let it briefly come back up to temperature after adding the puree. Turn off and serve immediately, or it can be made ahead of time and gently reheated.

Monday, November 24, 2008

Tea Spiced Cranberry Sauce

I thought that I should be posting something season appropriate, maybe something to inspire an upcoming holiday meal menu. Many different items came to mind, which I will post as time goes on but for now I setteled on one of my favorite things at a thanksgiving meal (aside from stuffing), cranberry sauce. This is a great recipe for cranberry sauce that I found in Sunset Magazine a while back. While it does use some spices and earl grey tea, it provides a subtle background of flavor that makes this cranberry sauce really well balanced, not too sweet, not too tart and with a lingering flavor of a hint of spice and tea. Give it a try!


I made a large batch a while back and canned it so I'm ready to go for the year! It's very easy to can, and you would do it the way you can any normal jam. There is enough sugar that things don't get to technical or require a pressure canner. In one of my upcoming posts I am going to blog about how I make my applesauce and will go more in depth about the steps I go through when I can a product. Until then, make a batch of this and enjoy all the great food this time of year brings!

Tea Spiced Cranberry Sauce (taken directly from Sunset Magazine)

In a 4-quart pot over high heat, combine:
1 3/4 cups water
2 1/4 cups sugar
4 whole cardamom pods
3 whole star anise
3 cinnamon sticks
Cover and bring to a boil, then reduce heat to medium-low and simmer 10 minutes.
Add:
5 Earl Grey tea bags
and simmer exactly 2 minutes. Remove tea bags and spices with a slotted spoon.
Add:
8 cups whole cranberries (about 2 1/2 bags, fresh or frozen).
Increase heat to medium-high and simmer, stirring often, until cranberries soften and split their skins and sauce thickens, about 12 minutes. Remove from heat and let cool to room temperature before serving (the sauce will thicken further as it cools). Or cover and refrigerate up to 4 days.

Sunset, NOVEMBER 2006

*Notes* I have found this lasts quite a bit longer than 4 days in the refridgerator. Before straining out all the tea bags and spices, make sure to taste the soultion, in the past I have found that 2 minutes isn't long enough and will let it sit (with the heat off) for 10-15 minutes or longer, until it's fairly strong tasting and then I'll proceed with the rest of the recipe. I have also tried this with other black teas (can be loose leaf) and have had great results.

Wednesday, November 19, 2008

Strata- variation

I love the idea of the vegetable strata I posted a few weeks ago and recently tried another version of this. I wanted to share this because it's completely different than the previous version. This recipe is more of an idea and you can really use whatever you have lying around. In this version I had some beautiful rainbow swiss chard that I needed to use up and I had also brought home some rye bread that had been sitting on the counter for a few days, and these turned out to be great components for the latest strata. In the previous recipe it made a full 9X13 pan which can serve at least 8, but this time, not only did I not have enough ingredients for a full recipe, but I also didn't want as many leftovers.


Rye Strata with Swiss Chard and Golden Raisins

There aren't any measurements this time, I started with an 8x8" pan and layered the bottom with thin slices of rye bread. Then I spread a layer of swiss chard that had been sauteed with some diced onion and seasoned with salt and pepper. On top of that I sprinkled some golden raisins and then repeated the layering process ending with another layer of bread. I cut the custard recipe in half- 1 cup of milk to 2 eggs and seasoned that with some more salt, pepper and nutmeg then I mixed in about 1/4 cup of grated Parmesan. I baked this at 375 until it felt firm in the middle. Use this as an inspiration for creating your own versions. I will continue to post more successful variations!

Sunday, November 2, 2008

Fried Green Tomatoes


As our summer winds down, I find myself with a tomato plant that was in the process of getting a second wind, but not enough sun and warmth to ripen the green tomatoes... what better time to try out fried green tomatoes? I had never had them before, but had heard many swoon over how good they were. There is rarely something fried that doesn't taste good, so I thought I would give it a shot. I had also had some bacon cheddar bread that I brought home so I was beginning to envision, Fried Green Tomato BLT's. After all is said and done I don't think a fried green tomato should be held back in a sandwich, but rather left to be on their own, because they are THAT good! They are firm and slightly tart, but the frying brings out an addictive sweetness and the breading with some panko and cornmeal gives a delicate crunch. Yum! The rest of the post will be just about frying the tomatoes and not the sandwich itself. I really liked how the pictures came out though and wanted to post them all.

The following directions are what you could call standard breading procedures you could use to fry all sorts of vegetables, chicken, ect. The first step is to dredge the item in flour, then into an egg wash, and finally into its outer coating, may that be cornmeal, panko or other bread crumb or perhaps a batter... The first coat of flour sticks easily to the product but also guarantees that when dipped in the egg wash, that too will stick which you need so what ever it's finally rolled in will also evenly adhere to the product. While this may seem tedious, it will result in an even crunchy coating over the product being fried, well worth the extra steps.


Fried Green Tomatoes:
You want to start with a high quality flavorful tomato that is green because it hasn't fully ripened yet. Do not start with a tomato that is green even when ripe- those aren't the kind of "green tomatoes we are talking about. Evenly slice the tomato into 1/2" slices. You want to make sure they are thick enough to stand up to the breading and frying without breaking, but not so thick that they don't have a chance to fully cook through. After they are sliced, sprinkle salt and pepper on both sides of the tomato. The key in flavorful fried products is to season every step, not just at the end by sprinkling on salt. After the tomatoes are sliced and seasoned, begin to assemble your breading station. Start with three containers, or bowls that will easily accommodate your largest tomato slice being able to lie flat in the bottom. In the first bowl you will have your flour. Start with about 1 1/2 cups of flour* add about 1/2 tsp salt and 1/2 tsp pepper to the flour (and maybe a little cayenne or paprika if you want things spicy). The next dish will have your egg wash. Start with 3 eggs and about 1/4 cup of milk. Beat together until all the egg is broken up and the milk is mixed in. The last container will have 2 cups of panko (a japanese bread crumb)** and about 1/4 cup cornmeal with 1/2 tsp salt and 1/4 tsp of pepper. After the breading station is set, start heating up some oil. I used my cast iron skillet but any heavy duty pot will do. Pour enough oil so that it comes about 2" up the side of the skillet. Heat the oil to about 365 degrees. Keep an eye on the oil to make sure it doesn't get really hot by using a fry thermometer or a candy thermometer. As your oil is heating, set up the station. As you can see in the picture above, I have the containers lined up- flour first, then egg, then panko. Start breading your tomatoes, dredge in flour, shaking off the excess. Dip into the egg wash, shaking off any excess and place in the panko conainer. Gently turn it over and shake the dish slightly to make sure everything gets coated. Be careful to not disturb the breading as you place it from dish to dish and as you finish set them on a cooling rack. I would advise getting them all breaded before frying. Then place that rack close to the stove and fry about 4 slices at a time (depending on how big your skillet is- if you can hold more, add a few more). When you are adding cold product to the oil the temperature drops dramatically, so make sure you don' t crowd the pan, and you may want to temporairly turn up the heat to let the oil recover.


After they become golden brown on the first side, flip them over and continue frying until golden brown on the second. After they come out of the oil have a paper lined sheet pan ready for them to sit on (as pictured down below). Don't put more tomatoes in the oven until the oil has gotten back up to the right temperature. Serve right away, plain or with maybe an herbed aioli? Enjoy!


Now that you have the basic breading procedure feel free to play around, the final breading doesn't always have to be panko, it could be all cornmeal or coconut or a mixture of things, the sky is the limit!

* this was written with the amounts to fry enough slices from about 4 medium large tomatoes. If you are frying more, increase the breading amounts.
** Panko is fairly easy to find these days, it is superior for frying because it doesn't easily get soggy. You could easily substitute dried bread crumbs for panko.

Thursday, October 30, 2008

Caramel Sauce


There are some things you can buy in the grocery store that are so easy to make yet so expensive to buy... like caramel sauce. A high quality caramel sauce might run you 6$ or 7$ for an 8 oz jar and really all it consists of is sugar, cream, butter and salt and a little know how...
The recipe I have below uses a little bit more salt, but it uses a high quality salt that makes this sauce incredibly flavorful and addicting. It is important to not use a cheap low quality iodized salt because it will only make your caramel sauce taste salty. I used a fleur de sel but any good salt will do, even a more every day sea salt. When you have a recipe that has only 4 ingredients you should make sure they are all of high quality because the flavor definitely shows through. The know how comes in the form of sugar cooking. This may seem complicated with all the different temperatures and precautions but for caramel, you don't even need a thermometer. You can gauge by color.

Caramel Sauce (makes about 1 1/4 cups)

1 cup sugar
1/4 cup water
2 TBS corn syrup
3/4 cup heavy cream
4 TBS butter (1/2 stick)
1/2- 1 tsp salt (depends on the salt and how coarse the grain)

Start with a medium size sauce pan. Put the sugar, water and corn syrup into the pan and stir to dissolve. Turn the heat on high, and place a lid on the pot and keep it on until the mix has come to a boil long enough that it has created steam. Wait until the steam has hit the top of the lid and is dropping back down the sides- this is cleaning the sides of the pot, making sure all the sugar is dissolved and pushed back to the bottom of the pot. At this point take the lid off and DO NOT STIR! Cook until the sugar is a deep dark amber- if it is too light then you don't get a strong caramel flavor, your sauce will just taste sweet, too dark and it will taste like burned marshmallows. It can be hard to tell the true color in the pan so take some out of the pan and drop it on a white plate.


Meanwhile, heat the cream up in the microwave, until it is lukewarm (it mixes into the hot sugar better this way). Once the sugar is a the right color, turn the heat off and SLOWLY steam the cream into the sugar using a whisk to mix it in. Pour about a quarter of the cream into the sugar, whisk, and then slowly pour in more. Since the sugar is so hot it will rapidly bubble and give off very hot steam, so you want to not only go slow, but also keep your hands out of the way (I've gotten a few steam burns this way). After all the cream is added in, if there is still sugar that hasn't melted in to the cream, you can turn the heat back on low to finish dissolving the sugar. Then let the mix cool slightly about 10 minutes or so, then add in the butter and salt. There is a range for the salt because if you are using a really fine grained sea salt, you will want to start with 1/2 a tsp (or even a little less) and if it's coarser you may find that after 1/2 a tsp you need more. Taste and add more according to your taste. You want to add enough salt so you get that hint of salt with the caramel flavor... it's amazingly addicting!
The sauce can be kept in the refrigerator for a few weeks with no problem. Make sure to gently rewarm before serving (getting it too hot will make it very thin).

Thursday, October 16, 2008

Gazpacho


I know it's a little late to post a mid summer meal like gazpacho, (when you have more tomatoes, peppers and cucumbers than you know what to do with). For me that came a little later this summer and then it took a while to put the post up. So it you are moving onto fall produce and meals, tuck this one away for next summer because it's surely a keeper! Or give it a try on the next nice fall afternoon we have! In my mind gazpacho should have some body to it, lots of flavor and some weight on your tongue, not just V-8 with some vegetables floating in it! I found a great recipe in The Gourmet Cookbook. What I like about this recipe is it has some bread in it (gives a great deal of body and mouth feel)and it roasts the peppers and tomatoes which brings a deeper depth of flavor. While it is a little more work than your normal gazpacho it is worth the work!

Gazpacho (adapted from The Gourmet Cookbook pg 88-89)
Serves 6 as a main coarse

2 pounds of tomatoes
2 red bell peppers
1 cucumber or 2 small kirby cucumbers (pickling cucumbers), peeled, seeded, chopped
4 cloves of garlic (finely chopped)
2 TBS of sherry vinegar
1/3 cup olive oil
4 slices (1/2" thick) good quality bread, crusts removed
2 tsp salt (or to taste)
1 tsp ground black pepper
1/2 tsp minced fresh tarragon (optional, if you have it)

Heat the oven to 350. Roast the tomatoes and peppers for 30 minutes. Remove the tomatoes and place them in a bowl to cool. Continue to roast the peppers until lightly charred, then remove them from the pan and place them in a covered bowl or paper bag until cool (helps to remove the skin). Remove skin and cores from tomatoes and tear the flesh into smaller pieces over a bowl to catch all the juice. Remove the skin and seeds from the bell peppers and add to the tomatoes. Add in chopped garlic, cucumbers, vinegar and oil.
Rip the pieces of bread into 1" pieces and add 1/2 cup water to the bread. Let it soak for 10 minutes. Drain any excess water, but don't squeeze the bread. Transfer the bread to the bowl with the tomato mixture along with the salt, pepper and tarragon (if using). Mix everything well and cover and let sit 8 hours to overnight)in the refrigerator. Up to a few hours before serving, thoroughly blend everything in the blender and check again for seasoning adding more salt, pepper or vinegar if necessary. Feel free to garnish with a little fresh herbs (basil or chives or parsley) on top. Serve chilled.

Sunday, October 12, 2008

Buttermilk Ranch

I am slowly working on a collection of salad dressings beyond the impromptu vinaigrette. This version of Ranch still has all the recognizable flavors but it's a little fresher, cleaner and healthier than your bottled variety. It's quick and easy and makes a great dressing for potato salad.


Buttermilk Ranch (makes about 1 cup)

1/2 cup buttermilk
1/2 cup sour cream (can use low fat) or mayonnaise (also can use low fat)
1 TBS chives, chopped fine
1 TBS dill, chopped fine
1 TBS oregano, chopped fine
1 tsp salt
1/4 tsp garlic powder

Put all ingredients into a blender or blend with a hand held immersion blender*, or for a little rougher texture, you can just whisk everything together. Will keep well for a week.

*I have found my immersion blender one of the most helpful tools in the kitchen. There all sorts of models you can buy with a varying price range to go with it, but you'll find even a basic $25 model very helpful for blending dressings, sauces, soups or basically anything you could put into a blender. If you are thinking of investing in one, I think the blenders with a stainless steel bottom (as opposed to plastic) are worth the extra money. The plastic bottoms can melt if you are often pureeing hot soups or liquids as the bottom has a tendency to soften and become a little misshapen. They usually will come with several other attachments like a whisk that works for small jobs (like whipping a few egg whites or a small amount of cream), and a small container with a blade that acts much like a food processor. There are many times I have pureed dips or pesto in there with great success. Out of all the kitchen gadgets out there this is definitely one I recommend!

Monday, October 6, 2008

Vegetable Strata

A strata is a savory bread pudding and the name strata refers to all the different layers. It can be made with many different combination's of ingredients. I love any food that uses bread as one of it's main ingredients. This one almost had the flavors of lasagna but using bread instead of noodles.


I layered this with slow roasted tomatoes (the recipe for them is great, I found it on Orangette , and was also featured in her column in Bon Appetite. Check it out, if you have any left over tomatoes). I layered the tomatoes with sauteed spinach, grilled portabellos, and some fontina and then on topped it with more tomatoes and Gorgonzola which formed a nice crispy crust that could be likened to a Gorgonzola tomato toast. Maybe a good recipe in the making, a little tomato spread on toast, topped with Gorgonzola and baked until crunchy. Hmmm....
This recipe I originally got from Vegetarian Cooking For Everyone by Deborah Madison I followed the recipe with a few modifications but this could certainly be deviated from, with endless possibilities! I'm thinking the next version might include something like roasted winter squash, caramelize onions... or maybe roasted apples, bacon, caramelized onions and Gouda... the possibilities are endless. This can easily be made in advance and is a perfect way to use up bread, especially bread a few days old.

Strata (8 servings)

1 lb portabello mushrooms tossed with olive oil, salt and pepper and grilled and sliced thin
2 bunches of spinach wilted, squeezed dry and chopped
approximately 1 1/2 lbs slow roasted tomatoes
5 cloves of garlic chopped finely
4 eggs
2 cups milk
pinch of freshly ground nutmeg
10 thin slices of good bread ( I used a mix of a baguette and a semolina bread)
2 TBS chopped rosemary
1/2 cup grated fontina
3/4 cup crumbled Gorgonzola

Pre- heat the oven to 375. Butter a 9x12" baking dish
Lay out a layer of roasted tomatoes along the bottom of the dish. Next lay down bread to cover the surface in a single layer. Scatter the spinach over the bread and follow with half of each, the herbs, garlic and fontina. Lay another layer of bread, and repeat the same process using the mushrooms this time in place of the spinach. Top with a layer of bread and then scatter the rest of the tomatoes and all the Gorgonzola. Mix the eggs milk and nutmeg together and pour the custard over the entire pan. At this point it can be baked immediately or it can wait several hours, covered and refrigerated. Bake in the oven until brown and puffed, about 1 hour. Cool for a few minutes before serving

Saturday, October 4, 2008

Braised Red Cabbage

I have obviously not mastered working full time in a job that keeps me busy, and a life that always has me doing something, AND blogging! I'm trying though, I think about it all the time and have not given up yet, and you shouldn't either! I have a few posts I will do over this weekend, to hopefully make up for an absentee summer. (Although I have only been averaging one post a month so it won't be hard to exceed!)
This first picture I have up is a sample from our CSA.


This stands for Community Supported Agriculture and this was our first year subscribing to it (but not our last). This is a program that lets people invest in a farms crop for the year, before the season starts and then each week you receive a mystery box of produce all during the season (usually running May through the fall). This was our first year doing it and we have loved it. I found the farm that we subscribe to through a website called Local Harvest. That is what I linked "CSA" to above. I wanted to link directly to the farms web site but it didn't seem to be working. It has been a great experience, and we have signed up for the fall season as well so we will have beautiful organic produce coming to us every week until December! It was my original intention to take a picture of every week's box and feature a recipe for each week to go with the picture... you can see how far I got with that! Every farm works their CSA differently, depending on what they grow/offer. The farm we went with, Groundworks Organics, is out of Eugene Oregon and they have been wonderful! During the week we would get an email of a list of proposed items, and then a newsletter on Saturdays when we picked up our box. I thought they did a great job of varying the produce, so we never felt like we were constantly eating the same thing! That reminds me of last summer when I pulled a rookie move of planting 5 zucchini plants (not knowing how easy or fast they grow) and towards the middle and end of the season we definitely had our fill! Never will I do that again, I quickly learned! With our CSA we have been able to experience a little of everything. So that brings me to our first recipe, for braised red cabbage. I had gotten a head of cabbage, and didn't have anything coming up (like a dinner party or get together) to use it on. I needed to find something I could make that would use up the whole head without us having to eat coleslaw for an entire week straight! I've always loved braised cabbage, and found a great recipe out of The Gourmet Cookbook. I have found many good recipes from there in fact (of course since they all come from the magazine!).


Braised Red Cabbage (from The Gourmet Cookbook pg 528)
serves 8-10 portions

1 medium size head of red cabbage quartered, cored and thinly sliced crossways
4 slices of bacon (medium dice)
1 TBS of butter
2 large onions sliced
1/2 cup white wine vinegar
3 TBS of packed brown sugar
1 TBS of salt
1 tsp freshly ground black pepper

Rinse cabbage under cold water, then drain; do not dry. Cook bacon in 6-8 qt heavy pot over medium heat until most of the fat is rendered and the bacon is crisp. Remove the bacon bits, and leave the fat in the pan, and add the butter. Add the onions and cook, stirring, until golden brown and then add the cabbage, and the rest of the ingredients. Cover and simmer, stir occasionally until cabbage is tender, about 1 1/4 hours. Sprinkle on bacon after done cooking.

*with only two of us in the house, we weren't able to finish all of it so I decided to see how it will hold up in the freezer. When I defrost it I'll let you know!

Tuesday, August 19, 2008

Roasted Banana Smores


Last weekend we spent a wonderful week camping in eastern Oregon. We had a lot of great food, but one of the best things we had while we were out there were these Roasted Banana Smores. It has become my favorite version of Smores, and it probably stems from my love of banana and chocolate together! They are very easy and we actually did them on the grill and not over a campfire, so this is something that doesn't even need to be saved for a camping trip! (although there are some things that just taste better when you've been in the woods all day)
Just as with any other recipe, your end result will only be as good as your beginning ingredients, so get some good chocolate and graham crackers (these were cinnamon graham crackers and we used a 70% dark chocolate bar) and while homemade marshmallows are best, store bought ones work well too...

Make sure your grill is nice and hot (works well if it was already going for some BBQ dinner.) Start with a square of foil. Take a banana and just trimming off the very tips of the banana, leaving the peel on, slice all the way down the middle and slightly open up the banana and also push down so you have a fairly wide, flat, exposed surface of the banana and put this on the foil and then bring the edges of the foil up, so it creates a little barrier all the way around the banana. Put the banana on the grill for maybe 5 minutes or so, (it will depend on how hot it is)just to start roasting the banana. You'll know it's done when the banana is warmed all the way through and you may even see a few juices bubbling underneath. At that point put a row of chocolate pieces (around 1" x 1/2" rectangles) down the center of the banana, cover with a row of marshmallows (about 2 1/2 larger marshmallows- cut them in half so they lay flat) and then cover the grill and let it cook for another 5 minutes or so until the chocolate and marshmallows are melted. At this point you should see more juices bubbling underneath and the banana will be pretty soft. Transfer the banana from the foil to a plate, leaving the skin on* and then top with crumbled up graham crackers!

*this picture doesn't show the skin of the banana, but on the second round I did end up cooking the banana longer and it was easier to just serve in the skin and eat around it.

Tuesday, August 5, 2008

Crispy Oat Bites


These cookies began with a recipe from Chocolate and Zucchini with a few extra additions... These are great little cookies to snack on, they aren't too sweet and are full of flavor and crunch. They are quick and easy to make at the last minute and can be as simple as just the plain cookie or dressed up by sandwiching with melted chocolate. You could also change out any of the "add in's" for whatever you have around or feel inspired by.


Crispy Oat Bites (Makes about 40 quarter sized cookies)

1/4 cup (50 g) melted butter
1/4 cup (50 g) brown sugar (could also use unrefined sugar like rapadura)
2 tsp honey (or agave syrup)
1/2 tsp vanilla
1/2 cup (45 g) rolled oats (or any other rolled grain)
1/2 cup (60 g) whole wheat pastry flour
1/2 tsp baking powder
pinch of salt
2 tbs milk
1/4 cup (20 g) toasted sliced/chopped almonds
1/4 cup unsweetened coconut
1/4 cup finely chopped cocoa nibs

Preheat the oven to 350
Melt the butter in a sauce pan, and then mix in the sugars and vanilla. Mix the flour with the baking powder, salt and oats and mix into the butter mix. Add the milk, after everything is mixed, add the rest of the add ins and mix until everything is evenly distributed. Use a teaspoon to scoop out little balls of the dough and put onto a greased sheet pan (or lined with parchment) and flatten out into round disks. Bake until golden approximately 12 minutes and then transfer to a cooling rack to cool.

Monday, August 4, 2008

Upside Down Cobbler

Sorry for the long absence! Summer and outdoor activities have seem to taken up all my time... I am back though, please don't give up!
This was adapted from a recipe I found on Martha Stewart's website. It was originally for a apricot almond cobbler, but it's more of a upside down cobbler because the batter goes in the pan first. It's also very flexible and could be more than just apricot and almond depending on what's around and in season. I loved it because it is a rustic dessert that was very quick, satisfying but not too indulgent. This worked beautifully in my cast iron pan but could easily work in a pie plate or other baking dish as well. I used peaches and berries and did put in the amaretto but that could easily be substituted for another liquor (brandy?) or even citrus juice. I'm sure this would be good in the winter with pears or cranberries... definitely a keeper though!


Peach and Mixed Berry Upsided Down Cobbler (serves 6-8)

Fruit:
1 1/2 lbs fruit (could be one kind or a combination)
6 tbs sugar
1 tbs of lemon juice
Toss fruit and let sit while the batter is mixed.


Batter:
1/2 almond meal toasted (or finely ground almonds or any other nut you wanted to substitute)
1 cup flour (I used whole wheat pastry flour but all purpose flour could easily be substituted)
3/4 cup sugar
1 1/2 tsp baking powder
pinch of freshly grated nutmeg
pinch of salt
6 tbs melted butter
1/2 cup milk
1 egg
2 tbs of amaretto (or any other liquor you wanted to substitute)

Pre heat your oven to 375. To mix the batter, start by greasing a 10" cast iron skillet with 2 tbs of butter. Whisk together the dry ingredients in one bowl and then in another whisk the egg, milk, liquor together then slowly stream in the remaining 4 tbs of butter while whisking vigourously. Combine the dry and wet ingredients together until just mixed and spread it into the the pan. Spread the fruit over the top. Bake in the oven until a skewer inserted into the middle comes out with moist crumbs. Will take around 40-50 minutes. Let cool in the pan before serving. This easily is cut into wedges and is somewhere between a cobbler and a cake and would be great on a picnic.

Sunday, June 29, 2008

Plum Danish Braid


Fresh danish and iced coffee make a wonderful afternoon treat. This is the June Daring Baker Challenge, and in typical fashion, it's due today and I finished it this morning. The recipe came from Sherry Yard's The Secrets of Baking. I have this book and like it a lot, so it was a lot of fun to have a push to try this recipe. I make a lot of danish and croissant at work, and don't usually make it at home, but it was so nice this afternoon, after a day of being lazy and hiding out at home, to sit down to danish that was still warm from the oven.
The trick about any sort of laminated doughs is incorporating the butter in evenly. It's important that the butter and dough are the same temperature, it is evenly spread over the dough and also rolled out consistently. As I was going through my lamination's I had some spots where the butter was colder than the rest and didn't get rolled in evenly. To be honest, until the danish went into the oven I didn't have very high hopes for it. I had made a fresh plum filling using diced plums which I tossed in some cornstarch and a little brown sugar. I cooked the filling in a saucepan adding some plum butter I made last summer to give some more body and flavor to the filling. After it had cooled, it was thick and had a bright tart flavor but was still sweet- the essence of a good plum. It stayed in the pastry nicely, and I was pleasantly surprised when I checked on my danish to see that all of the filling had stayed inside and the braid had held together nicely. It was a very warm day, the house was at the perfect temperature for proofing dough- but too hot for having the oven on! The sacrifices of a baker!
Below I have posted the directions as given for the challenge. Included is a recipe for an apple filling for the braid ( I wasn't measuring when I made my plum filling this morning). The filling is very flexible and you could do all sorts of things- but you do want to make sure the filling is fairly thick, too much moisture will interfere with the dough baking and also run out of the braid. While we did a braid for the challenge, you can use this dough for all sorts of danish shapes. I have the other half of my dough frozen for a later use. This may seem intimidating but freshly made pastry is unparalleled and worth all the work! If you have ever thought about making your own puff pastry this is a good place to begin. The lamination's (rolling the butter into the dough) are less for danish and it isn't solely dependent on the layers of butter for it's leavening (like puff pastry) because of the yeast it will still rise- it's pretty forgiving and a good place to start!

DANISH DOUGH (from Sherry Yard's The Secrets of Baking)

Makes 2-1/2 pounds dough

Ingredients
For the dough (Detrempe)
1 ounce fresh yeast or 1 tablespoon active dry yeast
1/2 cup whole milk
1/3 cup sugar
Zest of 1 orange, finely grated
3/4 teaspoon ground cardamom
1-1/2 teaspoons vanilla extract
1/2 vanilla bean, split and scraped
2 large eggs, chilled
1/4 cup fresh orange juice
3-1/4 cups all-purpose flour
1 teaspoon salt

For the butter block (Beurrage)
1/2 pound (2 sticks) cold unsalted butter
1/4 cup all-purpose flour

DOUGH
Combine yeast and milk in the bowl of a mixer fitted with the paddle attachment and mix on low speed. Slowly add sugar, orange zest, cardamom, vanilla extract, vanilla seeds, eggs, and orange juice. Mix well. Change to the dough hook and add the salt with the flour, 1 cup at a time, increasing speed to medium as the flour is incorporated. Knead the dough for about 5 minutes, or until smooth. You may need to add a little more flour if it is sticky. Transfer dough to a lightly floured baking sheet and cover with plastic wrap. Refrigerate for 30 minutes.

Without a standing mixer: Combine yeast and milk in a bowl with a hand mixer on low speed or a whisk. Add sugar, orange zest, cardamom, vanilla extract, vanilla seeds, eggs, and orange juice and mix well. Sift flour and salt on your working surface and make a fountain. Make sure that the “walls” of your fountain are thick and even. Pour the liquid in the middle of the fountain. With your fingertips, mix the liquid and the flour starting from the middle of the fountain, slowly working towards the edges. When the ingredients have been incorporated start kneading the dough with the heel of your hands until it becomes smooth and easy to work with, around 5 to 7 minutes. You might need to add more flour if the dough is sticky.

BUTTER BLOCK
1. Combine butter and flour in the bowl of a mixer fitted with a paddle attachment and beat on medium speed for 1 minute. Scrape down the sides of the bowl and the paddle and then beat for 1 minute more, or until smooth and lump free. Set aside at room temperature.
2. After the detrempe has chilled 30 minutes, turn it out onto a lightly floured surface. Roll the dough into a rectangle approximately 18 x 13 inches and ¼ inch thick. The dough may be sticky, so keep dusting it lightly with flour. Spread the butter evenly over the center and right thirds of the dough. Fold the left edge of the detrempe to the right, covering half of the butter. Fold the right third of the rectangle over the center third. The first turn has now been completed. Mark the dough by poking it with your finger to keep track of your turns, or use a sticky and keep a tally. Place the dough on a baking sheet, wrap it in plastic wrap, and refrigerate for 30 minutes.
3. Place the dough lengthwise on a floured work surface. The open ends should be to your right and left. Roll the dough into another approximately 13 x 18 inch, ¼-inch-thick rectangle. Again, fold the left third of the rectangle over the center third and the right third over the center third. No additional butter will be added as it is already in the dough. The second turn has now been completed. Refrigerate the dough for 30 minutes.
4. Roll out, turn, and refrigerate the dough two more times, for a total of four single turns. Make sure you are keeping track of your turns. Refrigerate the dough after the final turn for at least 5 hours or overnight. The Danish dough is now ready to be used. If you will not be using the dough within 24 hours, freeze it. To do this, roll the dough out to about 1 inch in thickness, wrap tightly in plastic wrap, and freeze. Defrost the dough slowly in the refrigerator for easiest handling. Danish dough will keep in the freezer for up to 1 month.

APPLE FILLING
Makes enough for two braids

Ingredients
4 Fuji or other apples, peeled, cored, and cut into ¼-inch pieces
1/2 cup sugar
1 tsp. ground cinnamon
1/2 vanilla bean, split and scraped
1/4 cup fresh lemon juice
4 tablespoons unsalted butter

Toss all ingredients except butter in a large bowl. Melt the butter in a sauté pan over medium heat until slightly nutty in color, about 6 - 8 minutes. Then add the apple mixture and sauté until apples are softened and caramelized, 10 to 15 minutes. If you’ve chosen Fujis, the apples will be caramelized, but have still retained their shape. Pour the cooked apples onto a baking sheet to cool completely before forming the braid. (If making ahead, cool to room temperature, seal, and refrigerate.) They will cool faster when spread in a thin layer over the surface of the sheet. After they have cooled, the filling can be stored in the refrigerator for up to 3 days. Left over filling can be used as an ice cream topping, for muffins, cheesecake, or other pastries.

DANISH BRAID
Makes enough for 2 large braids

Ingredients
1 recipe Danish Dough (see below)
2 cups apple filling, jam, or preserves (see below)

For the egg wash: 1 large egg, plus 1 large egg yolk

1. Line a baking sheet with a silicone mat or parchment paper. On a lightly floured surface, roll the Danish Dough into a 15 x 20-inch rectangle, ¼ inch thick. If the dough seems elastic and shrinks back when rolled, let it rest for a few minutes, then roll again. Place the dough on the baking sheet.
2. Along one long side of the pastry make parallel, 5-inch-long cuts with a knife or rolling pastry wheel, each about 1 inch apart. Repeat on the opposite side, making sure to line up the cuts with those you’ve already made.
3. Spoon the filling you’ve chosen to fill your braid down the center of the rectangle. Starting with the top and bottom “flaps”, fold the top flap down over the filling to cover. Next, fold the bottom “flap” up to cover filling. This helps keep the braid neat and helps to hold in the filling. Now begin folding the cut side strips of dough over the filling, alternating first left, then right, left, right, until finished. Trim any excess dough and tuck in the ends.

Egg Wash
Whisk together the whole egg and yolk in a bowl and with a pastry brush, lightly coat the braid.

Proofing and Baking
1. Spray cooking oil (Pam…) onto a piece of plastic wrap, and place over the braid. Proof at room temperature or, if possible, in a controlled 90 degree F environment for about 2 hours, or until doubled in volume and light to the touch.
2. Near the end of proofing, preheat oven to 400 degrees F. Position a rack in the center of the oven.
3. Bake for 10 minutes, then rotate the pan so that the side of the braid previously in the back of the oven is now in the front. Lower the oven temperature to 350 degrees F, and bake about 15-20 minutes more, or until golden brown. Cool and serve the braid either still warm from the oven or at room temperature. The cooled braid can be wrapped airtight and stored in the refrigerator for up to 2 days, or freeze for 1 month.
Wednesday, June 25, 2008

Peak of Their Season


When you start out with perfect ingredients, sometimes you don't have to do much to them- or should I say often times you shouldn't do much to them. Case in point, strawberries in peak season. Every week we recieve a mystery box from the farmers market and every week on most occasions, they contain a large 16oz box of strawberries. In the beginning they were ok, and have slowly worked their way towards getting better and better. This past week they were PERFECT. I wouldn't want to do anything to mask their sweet essense. SO dessert was simply the strawberries with some thick organic sour cream and a little brown sugar to dip it all in. Summer doesn't get any better than desserts like this!

Friday, June 20, 2008

Corn Casserole


When I was little I remembered a corn casserole that my grandmother made- and I loved! I could never get enough. Later as I was older and wanted to make it, I took one look at the recipe with 1 1/2 cups oil, cheddar cheese and all the other ingredients, and knew there was no way in good conscience I could make that. I had run across a recipe in Cooking Light Magazine that looked like it could be something close to what I remembered, so I decided to give it a try. It quickly became one of those "keepers"- it was everything I remembered it was. My husband didn't even want our guests to have seconds- he wanted to make sure he had some leftovers for himself! Coming from Cooking Light meant it had a healthier flavor profile- but still the perfect addition to any summer meal. Using peak of the summer corn is one of the keys to making this great. It does call for canned creamed corn, which I had made some last summer and froze, so I have used that, but the canned products work well, especially when pressed for time. One of these days I would like to not have to depend on a corn bread mix for my recipe (not my style) but my first attempt to deviate produced some different results so for now, here it is:

Corn Casserole (from Cooking Light Magazine)
1/4 cup egg substitute (or 1 egg OR 2 egg whites)
1/4 cup butter, melted
1 (8 3/4-ounce) can no-salt-added whole-kernel corn, drained
1 (8 3/4-ounce) can no-salt-added cream-style corn
1 (8 1/2-ounce) package corn muffin mix
1 (8-ounce) carton plain fat-free yogurt
Cooking spray

Mix all the ingredients together and pour it into a greased 8" square pan or 9" pie pan. Bake at 350 for 45 minutes or so, until the middle is completely set.

Monday, June 9, 2008

Oatmeal Cookies


Here is a great "lower in fat" healthier oatmeal cookie. Although it's been modified quite a bit, I got the original recipe from Perfect Light Desserts written by Nick Malgieri and David Joachim. This is a great book filled with solid recipes (at least the ones I've tried so far) that rely on real ingredients used smartly to make them healthier. It's not filled with sugar free products or whipped toppings. You wouldn't be able to tell these cookies are lower in fat, and I've packed them with all sorts of goodies.


Oatmeal cookies (makes about 24 cookies)

1 cup whole wheat pastry flour
1 tsp baking powder
1/2 tsp baking soda
1/2 tsp salt
2 TBS soft butter
1/2 cup sugar
1/2 cup brown sugar
1 egg (room temperature)
1/4 cup applesauce
1 tsp vanilla
1 1/2 cups oats
1/4 cup golden raisins (or dark if you want)
1/4 cup pepitas
1/4 cup cocoa nibs (these you could substitute chocolate chips, but the cocoa nibs give the richness of chocolate with more health benifits, and helps to temper the sweetness of the cookie)

Pre heat the oven to 375
Mix all the dry ingredients (flour through salt) together and set aside. In another bowl cream the butter with the white sugar, and then add the egg and then the brown sugar. With such little amount of butter, it's hard to mix if you put both sugars in at once. After everything is completely emulisified, mix in the applesauce and vanilla. At this point add all the dry ingredients and finally the oats, raisins, pepitas, and cocoa nibs.

Using parchment lined or greased sheet pans, scoop tablespoon fulls of batter onto the sheetpan, with a few inches between each cookie. At this point you could easily freeze half the cookie batter for later.
Bake the cookies for 10-12 minutes, just until you see the top is a light golden brown. If you bake them too long they will get very hard and crunchy. It's important to time the bake so they stay soft and moist after they cool.

Wednesday, June 4, 2008

What's for Lunch?

I realize I have been pretty slow on posting lately. Now that everything is put back into the kitchen and my inspiration is returning, I find myself very short on time! I'm not sure how some of these bloggers do it, who have to work other full time jobs. Most of what I've been cooking has been food to take to work for my husband and I. So I figured I could at least start posting some of the things I've been making for our lunches (and dinners since we both work nights)...


I was inspired by a beautiful bunch of parsley I had gotten in my weekly box from the CSA I subscribe to (will post more about that later). I couldn't think of a better use for it than a tabbouleh salad. This is a recipe I found in "How to Cook Everything Vegetarian" by Mark Bittman. I haven't had much of a chance to use it yet, but I found a great recipe in there for tabbouleh. One of the things I liked about it, is it had not only parsley, but a lot of mint as well as some scallions. I've modified it some and threw some crumbled tofu on top.

Tabbouleh Salad-4 generous servings

1/2 cup medium grind or fine grind bulgur
1/4 cup good quality olive oil
1/4 cup lemon juice
zest of 2 lemons
2 cups chopped parsley
1 cup chopped mint
1/2 cup chopped scallions
2 medium tomatoes (or 2 cups of cherry tomatoes cut in half)
1/2 of a cucumber (about 1 cup) chopped

Bring a medium sized sauce pan filled with water to a boil. Add the bulgur and let it come back up to a boil and then immediately turn off the heat. Let it sit until softened, and then drain well. Season the bulgur with the lemon juice, olive oil, and some salt and pepper. In a separate bowl mix the herbs with the lemon zest. Shortly before serving, combine the bulgur with the herbs and tomatoes and cucumber, check again for seasoning (may need a little more salt and pepper).

Saturday, May 10, 2008

Pumpkin Chocolate Chip Cookies

Pumpkin Chocolate Chip Cookies


I'm still a little slow to post, even though we have full use of our kitchen we are still busy with finishing up the details. I did want to put up a quick post, and I know that these are totally out of season, but I love these cookies and wanted to put them up on the blog! This fall when all the pumpkins were fresh from the ground I went kind of crazy buying 10 of them and spent the better part of a day roasting, pureeing, portioning and freezing the puree. The work paid off though because I have wonderfully flavorful pumpkin puree to make these cookies with! As fall is beginning to get closer (not that close) and I still have lot's of puree left I might have a few more out of season pumpkin posts (to clear my freezer for the next batch)! These cookies are very light and tender but full of flavor.

Pumpkin Chocolate Chip Cookies
1/2 cup butter
3/4 cup brown sugar
3/4 cup white sugar
1 egg
1 tsp vanilla
2 tbs plain yogurt
1 cup pureed pumpkin (if you are using canned pumpkin add up to 2 TBS of milk if the puree seems very thick, it should be the consistency of the yogurt)
2 1/4 cups whole wheat pastry flour (can substitute all purpose flour)
3/4 tsp salt
1 tsp baking soda
1 tsp baking powder
1 tsp cinnamon
1/4 tsp nutmeg
1/8 tsp cloves
1/8 tsp allspice
1/8 tsp mace
1 1/2 cups chocolate chips (or your favorite chocolate cut in to small pieces)
1/2- 1 cup chopped pecans or walnuts (also optional)
1 cup rolled oats (optional- I think they are only good in the cookies if batter sits a few days in the refrigerator, giving the oats time to soften)

Pre heat the oven to 375. It is important that all the ingredients are at room temperature. Cream together the sugars and butter until light and fluffy. Slowly add the egg and vanilla and yogurt. Mix until it is completely emulsified. Sift togeher the dry ingredients and add alternating with the pumpkin then add the oats and choclate chips. Scoop into heaping tablespoon mounds on a greased cookie sheet. Bake for 12-15 minutes, when you touch the center of the cookie it should spring back. It's important not to overbake these cookies or they get dry. I like to make this batter, scoop it out onto a cookie sheet and then freeze the dough. Once frozen put all the cookies into a zip lock bag and bake just as many as you need. They will be good in the freezer for quite a while. This works well with any basic cookie dough and it's an easy way to bake something when you have a sweet tooth and it also lets you only have a few around to tempt you at a time! Nothing is better than fresh cookies warm from the oven.