Showing posts with label whole grains. Show all posts

Thursday, March 11, 2010

Granola

Granola


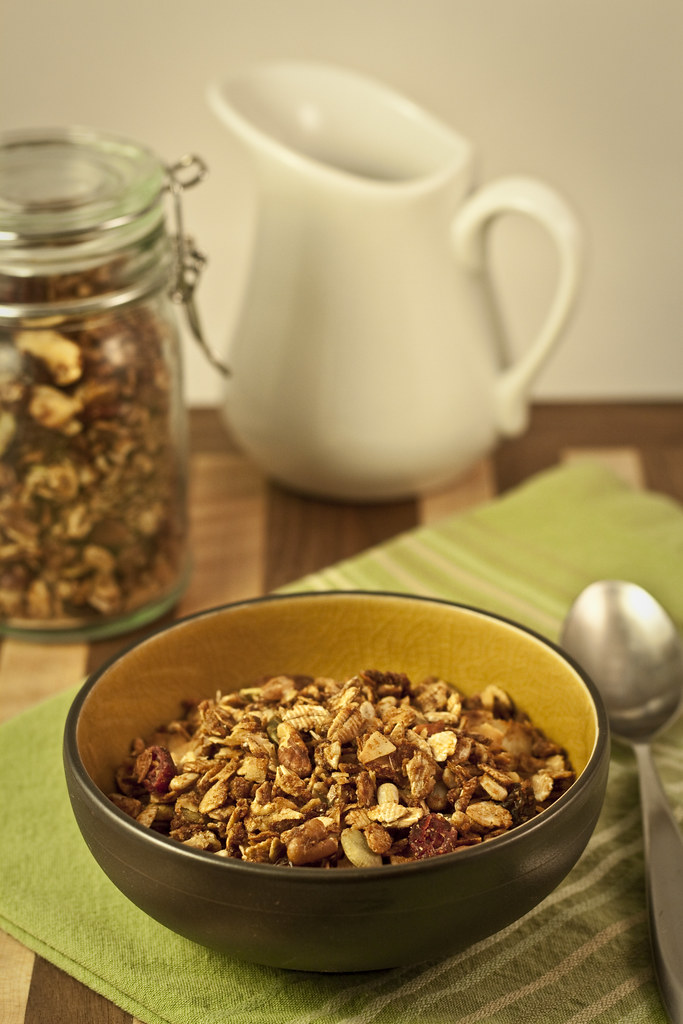
Granola can be made from so many different things, you can use different kinds of flakes (not just oats) including barley flakes, triticale flakes (both of which are in the picture). It can be made with or without coconut, it can have a number of different nuts or seeds, or none at all. There are many different dried fruits that can be added, or left out completely. The point is you can make granola how you like it, don't feel too confined by the recipe given here. The oats, nuts, coconut, fruit are all considered "garnish" and can be substituted for whatever you want... only like oats and nothing else? Substitute everything else for oats. Only like nuts and oats but nothing else? Leave the rest out and increase the amount of nuts and oats... all you have to do is add up the amount of total garnish (except the dried fruit which is added after cooking) and divide up however you desire. The total amount of garnish is 10 cups.

Granola (makes approximately 13 cups)

4 cups rolled oats
1/2 cup nonfat dried milk
1/2 cup wheat germ
2 cups unsweetened large flake coconut
1 cup chopped or slivered almonds
1 cup sunflower seeds
1/2 cup pumpkin seeds
1 cup chopped pecans
6 TBS honey
6 TBS maple syrup
1 TBS cinnamon
1 tsp nutmeg
2 tsp vanilla
1/4 cup brown sugar (I used a coconut palm sugar instead)
1/4 cup melted butter
1 cup raisins
1 cup cranberries

Pre Heat the oven to 300 degrees Fahrenheit. In a large bowl mix together the honey, maple syrup, cinnamon, nutmeg, vanilla, brown sugar and butter. Once it is well mixed, stir in everything else but the dried fruit (if the dried fruit is baked it will become too hard). Once everything is well mixed and coated, spread the granola out on 2 large baking sheets and put into the oven. Stir every 10 minutes making sure to that everything cooks evenly. It will take approximately 30-40 minutes. The granola is done when it is a golden brown. Take the mix out and let cool on the sheet pan. Once everything is cool, mix in the dried fruit and store in an air tight container to prevent the granola from getting stale.

Wednesday, December 24, 2008

Dinner Rolls

_MG_0021


When I think of dinner rolls, I think of a dough enriched with some butter to make the bread tender and some sugar to sweeten it a bit. These rolls made with part white flour and part whole wheat flour, a very mild and light bread- a great dinner roll. This dough also works well for making stuffed buns. You can stuff them with all sorts of things, ham and cheese, or caramelized onions and maybe some roasted butternut squash... anything you could possibly think of! In an upcoming blog I'll come up with an example or two for you. For now, here is the recipe for the rolls, sorry it may be a little late for Christmas dinner, but once all of the excitement has died down give them a try! I am making them tonight for Christmas dinner tomorrow and have made the dough but am letting it rise overnight. Tomorrow I'll shape, proof and bake the rolls fresh for dinner tomorrow. These can easily be done in one day- in about 3 hours or it can be broken up over two days. Or you can make the rolls ahead of time and then freeze them.

Dinner Rolls (makes about 18 rolls)

1 1/2 cups (360 g) water, about 75 degrees
1/3 cup and 4 tsp (30 g) non fat dried milk powder
1 3/4 cup (225 g) whole wheat flour
3 cups (400 g) bread flour
2 1/2 tsp (12 g) salt
2 3/4 tsp (8 g) instant yeast
1/4 cup (60 g) sugar
1/4 cup (60 g) butter, room temperature

Mix the water and milk powder in a bowl. In another bowl mix all the dry ingredients together, stirring to make sure everything is equally distributed. Add the water and butter to the dry ingredients.
To Mix by hand:
Grab the dough and start squeezing the dough through your hand and keep incorporating everything until you no longer see any dry ingredients. As you are grabbing the dough, focus on the spots where there are dry ingredients still visible. After it is all mixed in, let it sit either in a bowl covered or on the counter with the bowl over the dough (to prevent it from getting dried out). Let the dough rest and hydrate for 5 minutes then knead the dough until it's smooth and developed.
To Mix on a mixer: put all the ingredients into a mixer and mix on low speed for 10 minutes.
After the dough is developed put it into a clean greased bowl and let it rise for 45 minutes (or if letting it rise overnight, let it sit out for 30 minutes, then re round the dough and put it into a covered bowl and into the refrigerator. The next day take the dough out, portion, round and let the dough proof.). After 45 minutes, turn the dough onto the counter and gently pat down and fold the four sides in and turn the dough over and let rise once more until the dough has doubled in size (about 30-45 minutes depending on the temperature in the kitchen). Turn the dough out on the counter and either using a scale portion out the dough to 2 oz pieces, or you can just eyeball it and cut them into 18 equal pieces. Pat the dough into a flat disk, and then gather all the edges up, and pinch to make a tight seam. Putting the seam on the counter, cup your hand over the dough and roll in a small circle to tighten the top of the dough and seal the seam. Place them on a greased sheet pan (or on a parchment lined sheet pan)and then cover them with a cloth or some plastic wrap (loosely so the dough has room to rise) and then let them rise until they are double in size. If you want them to be shiny, brush them with egg wash (a mixture of egg and a splash of water well mixed) before baking. Bake at 375 degrees for about 20 minutes or until the rolls are a dark golden brown. After they come out of the oven put them on a cooling rack to cool. Have a wonderful holiday season!

Monday, June 9, 2008

Oatmeal Cookies


Here is a great "lower in fat" healthier oatmeal cookie. Although it's been modified quite a bit, I got the original recipe from Perfect Light Desserts written by Nick Malgieri and David Joachim. This is a great book filled with solid recipes (at least the ones I've tried so far) that rely on real ingredients used smartly to make them healthier. It's not filled with sugar free products or whipped toppings. You wouldn't be able to tell these cookies are lower in fat, and I've packed them with all sorts of goodies.


Oatmeal cookies (makes about 24 cookies)

1 cup whole wheat pastry flour
1 tsp baking powder
1/2 tsp baking soda
1/2 tsp salt
2 TBS soft butter
1/2 cup sugar
1/2 cup brown sugar
1 egg (room temperature)
1/4 cup applesauce
1 tsp vanilla
1 1/2 cups oats
1/4 cup golden raisins (or dark if you want)
1/4 cup pepitas
1/4 cup cocoa nibs (these you could substitute chocolate chips, but the cocoa nibs give the richness of chocolate with more health benifits, and helps to temper the sweetness of the cookie)

Pre heat the oven to 375
Mix all the dry ingredients (flour through salt) together and set aside. In another bowl cream the butter with the white sugar, and then add the egg and then the brown sugar. With such little amount of butter, it's hard to mix if you put both sugars in at once. After everything is completely emulisified, mix in the applesauce and vanilla. At this point add all the dry ingredients and finally the oats, raisins, pepitas, and cocoa nibs.

Using parchment lined or greased sheet pans, scoop tablespoon fulls of batter onto the sheetpan, with a few inches between each cookie. At this point you could easily freeze half the cookie batter for later.
Bake the cookies for 10-12 minutes, just until you see the top is a light golden brown. If you bake them too long they will get very hard and crunchy. It's important to time the bake so they stay soft and moist after they cool.

Wednesday, June 4, 2008

What's for Lunch?

I realize I have been pretty slow on posting lately. Now that everything is put back into the kitchen and my inspiration is returning, I find myself very short on time! I'm not sure how some of these bloggers do it, who have to work other full time jobs. Most of what I've been cooking has been food to take to work for my husband and I. So I figured I could at least start posting some of the things I've been making for our lunches (and dinners since we both work nights)...


I was inspired by a beautiful bunch of parsley I had gotten in my weekly box from the CSA I subscribe to (will post more about that later). I couldn't think of a better use for it than a tabbouleh salad. This is a recipe I found in "How to Cook Everything Vegetarian" by Mark Bittman. I haven't had much of a chance to use it yet, but I found a great recipe in there for tabbouleh. One of the things I liked about it, is it had not only parsley, but a lot of mint as well as some scallions. I've modified it some and threw some crumbled tofu on top.

Tabbouleh Salad-4 generous servings

1/2 cup medium grind or fine grind bulgur
1/4 cup good quality olive oil
1/4 cup lemon juice
zest of 2 lemons
2 cups chopped parsley
1 cup chopped mint
1/2 cup chopped scallions
2 medium tomatoes (or 2 cups of cherry tomatoes cut in half)
1/2 of a cucumber (about 1 cup) chopped

Bring a medium sized sauce pan filled with water to a boil. Add the bulgur and let it come back up to a boil and then immediately turn off the heat. Let it sit until softened, and then drain well. Season the bulgur with the lemon juice, olive oil, and some salt and pepper. In a separate bowl mix the herbs with the lemon zest. Shortly before serving, combine the bulgur with the herbs and tomatoes and cucumber, check again for seasoning (may need a little more salt and pepper).

Friday, March 21, 2008

Comfort food made healthier


It seems to be a constant struggle, how do you make the foods you loved as a kid and the foods you indulge in, healthier? My philosophy is to cut back on the fat where you can, but to also try to fit more vegetables into the dish to bulk it up and cut back on the fat per serving. The other way I look at it is, always trying to make foods that somehow contribute to your daily servings of fiber, vegetables, protein, whatever it may be, make it count- no empty calories. Granted there will be some here and there, but I believe if you take this approach daily, you can still eat foods you enjoy but create a healthier diet for yourself. This dish would be a classic example. The sloppy joes are loaded with veggies and the bun has whole wheat flour and lot's of flaxseed. I used ground flax and found that it created a really nice and chewy texture in the bread.

Sloppy Joes (serves about 6)

1 lb lean ground beef (or turkey, chicken or even crumbled tofu)
1 medium onion diced
1 green bell pepper diced
2 medium cloves of garlic finely chopped
2 cups grated butternut squash (either using a cheese grater or food processor)
1 1/4 cups tomato juice (this is flexible- tomato puree or v-8 or reg tomato juice)
1 cup BBQ sauce
1 TBS Worcestershire
1 TBS brown sugar

Brown the meat in a large saute pan. Cook through and set aside to drain on a paper towel. Drain all of the fat except about 1 TBS(if your meat is very lean you may have to add some oil. Saute all of your vegetables and garlic just beginning to get tender. Add the tomato juice and cook down until it has reduced by about half then add the BBQ sauce, brown sugar, and Worcestershire) and cook until for about 15 minutes and then add the beef back in. You want to make sure you cook it until the sauce is fairly thick adding the ground beef towards the end. This freezes well.

Flax Seed Rolls or Hamburger Buns (Makes 12 medium size rolls)

8 oz all purpose flour
10 oz whole wheat flour
2.5 oz rye flour
2 oz flax seed (about 1/2 cup)
1 1/4 tsp instant yeast
2 TBS honey
14.6 oz water
2 tsp salt

Mix all the dough except the salt. Mix until all the flour has been mixed in but don't start kneeding the dough yet. Cover and let this sit for twenty minutes. After the 20 minutes are up mix in the salt. This gives the yeast a head start and gets it working it also gives the flour a chance to absorb all the liquid, making it a lot easier to handle. Sprinkle the salt on top and either by hand or machine, mix for 5 minutes or so, until the dough is smooth and elastic. Put the dough in a greased bowl, cover and let it rise until double (in a warm place) this will take about 1 hour assuming the room is 70 degrees or so (if it's colder it will just take longer. Gently deflate the dough and let it double again (this should only take about 20 minutes or so). **Alternatively you can mix the dough and then just put covered bowl in the refrigerator overnight and let it proof slowly. The next day take it out and let it sit at room temperature for a few hours to give the dough a chance to warm up and then continue as normal** After the dough has doubled for the second time turn it out onto a very lightly floured surface and divide the dough into 3 oz portions (you can eyeball this or weigh it) and you should have about 12 buns. Roll them into a rough round and let them sit for 20 minutes covered. Meanwhile turn the oven on to 375 and prepare a pan with either parchment or grease. Crack 1 egg into a bowl, add a pinch of salt and 1 tbs water and stir until the egg is completely broken up. After the twenty minutes re-round the balls making sure you they are smooth all over. Place them on the sheet pan and take your hand and flatten each ball as much as possible (this will create a wider surface and more of a bun shape) let them rise in a warm place covered until they have doubled in size. This should take anywhere from 1/2 hour to an hour. After they are fully proofed brush some egg wash on each bun and press down gently again to help to flatten them (they bounce back quite a bit). Bake at 375 until a dark golden crust forms. Probably about 1/2 an hour. Let them cool completely before cutting in half. These freeze well.

Wednesday, February 6, 2008

English Muffins


Once you have a fresh english muffin you'll never go back to store bought again! But isn't that to be said for pretty much everything homemade? It had been a long time since I had made english muffins, and I had gotten The Bread Bible by Beth Hensperger from the library and it had a promising looking recipe that worked out wonderfully. These are easier and less time consuming than many yeast risen breads. You can see I cut my muffins out in the shape of squares, to minimize the waste of the dough (less to roll out afterwards) you could make them even more rustic by rolling the dough into a square and then cutting it with a knife that would yield no scrap and you would be done in one shot. Or if you prefer rounds you could also cut them into rounds.

Cinnamon Raisin English Muffins- makes 18 2 inch square muffins
(adapted from The Bread Bible by Beth Hensperger)

1 1/2 cups milk (scalded and cooled to room temperature)
2 1/4 tsp instant yeast
1 tsp sugar
1 large egg (room temp)
2 tbs softened butter
2 tsp salt
1/2 tsp cinnamon
2 cups AP flour
2 1/4 cups whole wheat flour
1/2 cup raisins soaked in water for 20 minutes

When ever I use milk in a bread recipe I scald the milk first because there is an enzyme in there that prohibits yeast from operating at it's full potential. So often recipes skip this step. I have yet to do a side by side comparison but it's one of those rules I choose to live by... so I scald my milk (which is right before it begins to boil). But make sure you cool it back down because if you use it too hot your yeast will die- then it's all for nothing! To cool the milk, I started by putting it in a big clean bowl and adding my butter in (if it melts, it's ok) and then once it was slightly cooler, I used that as an opportunity to mix my egg in, making sure it was pretty well mixed in before adding the rest of the ingredients. Make sure the raisins are well drained so you don't add a lot of extra water to the formula. You can use a mixer or mix the dough by hand. Mix until the dough is smooth and elastic. Turn that dough into a clean greased bowl, cover with plastic, and put it somewhere warm, where it can double in size. After it's doubled, gently fold the dough on itself a few times and turn it over so the bottom is on top. What this does is, redistributes the yeast through out the dough, and also evens out the temperature, it's kind of like a second wind for the dough- to give it more rising power. From here let it sit about 20 more minutes (it should be about 1 1/2 times it's size). Turn it out onto a floured surface and gently pat it into a square. Let it rest about 20 minutes (covered with the same plastic wrap) and then continue to roll out until about 1/4- 1/2 inch thick. From here you can either cut them (using a cutter of some sort)into rounds or squares (I happened to have a fun set of square cutters)or you can just use a knife and cut them into squares. You can make them as small or large as you want. Transfer the muffins to a sheet pan that has been sprinkled with cornmeal (to prevent them from sticking) and then once you have cut all you can cut, round the scraps into a ball and let it sit about 10 minutes giving the chance for the dough to relax before re rolling. For the muffins that are ready to be cooked, sprinkle the tops with some more cornmeal and cover them with plastic to let them rise until about double in size. Re roll the scraps one time and then make sure you give those enough time to rise before cooking. To cook, heat up a skillet or whatever you would use to cook pancakes (something fairly large with a lot of flat surface area). You want them to have about the same amount of heat (about medium)as you would cook pancakes. You want to be able to cook them about 5-8 minutes a side. By the time both sides are a nice dark golden brown, the muffins should be cooked through you can always double check by sticking a thermometer in the side (to reach the middle) and you want it to at least read 185 degrees. You can cook them in batches, keeping an eye on the uncooked ones to make sure they aren't rising too much. After you take them off the heat cool them on a rack and you can presplit them with a fork it you want.

Tuesday, January 15, 2008

Granola


I had been wanting to make some granola for quite a while, and always seem to run out of time and then see the bulk bin at the grocery store on sale (there's a good low fat apple cinnamon granola we like) and give in and this cycle has been going for some time. Finally we had been out of granola for quite a while and I had the time to make some! I also had a large container of pear butter I have been wanting to use up. I went on a pear and apple butter making spree a while a go and managed to can most of it but I had a container in the refrigerator I had wanted to use. Despite all the recipes I had that I wanted to try out I thought it might work to use the pear butter as a binder, and it did! It ended up making a really nice granola. I know it is easy to make your own but I was reminded of just how easy it is and really how little time it actually took. You want to make sure to use a good quality apple butter (maybe one without high fructose corn syrup... Granola is so flexible as far as what you put in it. You could use all oat flakes as well instead of the combination of barley, oat and triticale. You can also use any kind of nut and fruit combo you want.

Granola
2 cups rolled oat
2 cups barley oats
2 cups triticale oats
1 cup unsweetened coconut
1/2 cup ground flax
1 cup pear or apple butter
1/4 cup maple syrup
1/2 tsp cinnamon
1/4 tsp nutmeg
4 cups add ins (dried fruit, nuts- I used almonds, hazelnuts, raisins, golden raisins, dried cherries)

Pre heat the oven to 300. Mix together the oats, barley and triticale along with the flax and coconut. In a separate bowl combine the pear butter, maple syrup and spices. Pour this over the dry ingredients and mix until it looks like everything has been coated. Spread this out over 3 greased sheet pans (some can sit in the bowl if you are short on sheet pans). Bake for probably about 30 minutes or so. You really are looking to see that the oats are golden and that once taken out of the oven, and when it cools, it is crunchy. You can test this by taking a little bit off the sheet pan and letting it cool for a moment on the counter... and if it seems like it's pretty crunchy once it's cool to the touch, then it's done. To ensure that it gets cooked enough keep cooking it as long as you can before it gets too brown. While it's cooking you want to stir about every 10 minutes or so to make sure all the granola gets moved around. If you don't you'll end up with some nice and crunchy (the stuff on the edges) and then some that's pretty soggy (the stuff that's right in the middle). After all the granola is baked and fairly cool then you can add the dried fruit and toasted nuts (toasting them brings more flavor out). I don't think I really measured this, just a hand full of this and a hand full of that.... so if 2 cups total looks like too much to you, don't add it all in or if you like a lot of stuff in your granola, add more. Enjoy!

Thursday, January 10, 2008

Cranberry Cornmeal Muffins

We often have muffins around, I like them as a healthy quick and easy snack. Because they are around often, I like to make them as healthy, and try to incorporate as much fiber as I can. I have quite a few favorites I like to use, but this is a new recipe that turned out nicely. As time goes on I will post some of the other recipes I like, but for now this recipe turned out to be a great way to use up some left over cranberries. As with all muffin recipes,they are very flexible and any other berry could easily be substituted.


Cranberry Cornmeal Muffins (makes about 15 smaller muffins or 12 larger ones)

3/4 cups spelt or whole wheat pastry flour
3/4 cups all purpose flour
1 cup stone ground cornmeal
1/2 cup sugar
2 1/2 tsp baking powder
1/2 tsp baking soda
1/4 tsp salt
1/4 tsp cinnamon
3 tbs ground flax seed
1 1/4 cups buttermilk
2 eggs
1 tsp vanilla
3 tbs oil or melted butter
1 1/2 cup cranberries (you can chop them or keep them whole)

Preheat the oven to 400 degrees.
Mix all the dry ingredients in a medium bowl. Mix the wet ingredients (buttermilk, eggs, vanilla and oil) to combine and pour into dry ingredients. Continue mixing until almost all mixed in, and add the cranberries and fold just until all the dry ingredients are no longer visible. At this point while you are greasing the muffin tins let the batter sit 10-20 minutes. By letting the batter sit it gives it a chance for all the liquid to be absorbed by the dry ingredients, which will make the batter thicker and easier to scoop. Fill the muffin tins 1/2 - 3/4 full and bake until the muffin springs back when gently pressed in the middle. Rotate the muffin tins half way through baking to help bake evenly. After taking out of the oven let them cool for 5-10 minutes and turn them out onto a cooling rack until completely cool.

Friday, January 4, 2008


Nothing is better than a fresh loaf of bread. Next to it in the picture is some pear butter I made earlier on in the season, and I'm sure this is going to make one killer peanut butter sandwich with my freshly baked bread!
I got this recipe from King Arthur Flour Whole Grain Baking page197. I love whole grains and try to sneak them in whenever I can but sometimes, especially with yeasted breads sometimes a little white bread flour is necessary to achieve the light airy texture

Honey Oatmeal Sandwich Bread
1 1/4 cups (10 oz) boiling water
1/4 cup (1 oz) nonfat dry milk
1 cup (3 1/2 oz) rolled oats
2 tbs (1 oz) unsalted butter
1 1/2 tsp salt
1/4 cup (3 oz) honey
1 cup (4oz) whole wheat flour
1 2/3 (7 oz) bread flour
2 tsp instant yeast

Combine the first 6 ingredients and let sit until room temperature. Put into a mixing bowl and mix with flours and yeast. Mix until all ingredients are incorporated and let the dough sit 5 minutes so the flour has a chance to absorb some of the liquid. Mix the dough until it is smooth and elastic. Place in a clean bowl and let rise until double (about 45 minutes) and then gently deflate and place in the bowl for a second rise until double (about 20 minutes). Turn out on a lightly floured board and roll out to about 1/4 inch with the width matching that of the length of the loaf pan. Roll dough towards you and make sure to secure the seam. Place dough into a greased 9x5 inch loaf pan and let rise until the dough rises above the pan by about 1 inch. Brush egg wash on and bake in a preheated oven at 350 until a dark golden brown, covering with foil if needed and temping the loaf if unsure of doneness. The temperature should read 190 degrees Fahrenheit.

Wednesday, January 2, 2008

Fresh cinnamon rolls, a healthy way to start off the day!


I teach how to make great cinnamon rolls, but not the kind you want to start off a healthy day with. I love sweet breads with the flavor of cinnamon and raisins so I wanted to find a healthier more whole grain version of cinnamon rolls. I found one in King Arthur Flour Whole Grain Baking cookbook that I liked a lot. They are called Dark and Dangerous Cinnamon Buns. I have a filling that I really like and so I paired the dough for these rolls with a cinnamon raisin filling and left them at that. Sure the frosting gives it a more finished appearance and maybe some would argue is the best part, but it also just adds more unneeded sugar. As much as I like sweet things, the older I get, the more sensitive I become to sugar and the effects it has on my body.

Whole Grain Cinnamon Rolls
3/4 cup plus 2 TBS (7 oz) water, cool
1/4 cup(2 oz) orange juice
1/4 cup (1 oz) nonfat dry milk
1 1/2 tsp salt
5 TBS (3 3/4 oz) honey
1 egg yolk (the white will be used later in the filing)
4 TBS (2 oz) unsalted butter, soft
3 1/2 cups(14oz) whole wheat flour
1/2 cup(1 3/4 oz) old fashioned oats
heaping 1/2 cup (1 1/4 oz) dried potato flakes
2 teaspoons instant yeast

Combine the dry milk with the water and orange juice and stir to combine, then whisk in the egg yolk and put into mixing bowl. On top of that add the salt and all the rest of the ingredients, ending up with the yeast on top. Mix the dough until everything is mixed in and let it sit for 5 minutes giving the flours a chance to hydrate. Then turn the mixer on and mix the dough using the dough hook until the dough is smooth and well developed. Put that into a clean greased bowl and let this rise until it doubles about 45min to 1 hour. While the dough is rising, you can make the filling.

Cinnamon Raisin Filling
3.5 oz almond flour or powder (just finely ground almonds)
2 oz brown sugar
1 oz maple syrup
2 oz (about 2 ea) egg whites
.33oz (10 grams) cinnamon
1.67oz (50 grams) golden raisins (sprinkle on before rolling the dough- don't mix into the filling)

Measure everything into one bowl and stir until well combined. Spread onto rolled out dough (when ready)and then evenly sprinkle on the raisins.

After the dough has about doubled turn the dough over in the bowl and gently deflate by pressing down on the dough and in turn fold all four sides of the dough in and turn the dough back over. This just redistributes the yeast and temperature and prepares the dough for a second rise. Let it rise again until double (this should only take about twenty minutes)
Turn dough onto a clean dry surface and roll out into a 12x16" rectangle. Spread the filling over the rectangle leaving one of the longer edges with a strip of no filling about 1/2" wide so when the dough is rolled up the filling won't be oozing out the roll. Start rolling with the long side that has filling all the way to the edge. Don't roll too tightly, but make sure the roll isn't so loose it looses it's shape. Roll all the way up and make sure the seam is sealed (you may need to gently pinch it with your fingers) and put the seam side down on the cutting board and cut the log into 16 equal pieces (the slices will be about 1" wide) place them in a pan or on a sheet pan (you would need a greased 9x13"pan or 12" round pan, or a sheet pan if you prefer that they stay separate). Put the pan in a warm spot and preheat the oven to 350 and then place the rolls in to bake when they have just about 1 1/2 times the size they were before(this will take about 1-1 1/2 hours) Bake until golden about 25- 30 minutes